Hi ladies. Today I'm posting a Layout I created using one of my Crafty Secrets Stamp Sets - Baby Girl Clear Art Stamp Set. Check out the actually stamp set at the bottom of the post, so you can see how I used it.
Frame and Masking Tutorial
I began with my photo and matted it. Next I had to determine the width of the frame around the photo. The sides had to match the width of a series of the scallops if I wanted to finish the corners nicely. If you take a look at the photo of the stamps for this set, you will see that the scalloped image as 6 scallops. I stamped the image twice on a piece of scrap paper, end to end to help figure the measurements of the frame.
I liked 7 scallops across by 10 scallops vertically. So I measured across from edge to edge for 7 scallops, that equaled just short of 4", and again from edge to edge for 10 scallops - 5 5/8". So now I had my measurement for my guidelines of the frame. I cut a piece of white cardstock 6" x 7.5" and penciled in my guidelines, creating a 4 x 5 5/8" rectangle (I used a pen on mine so it would show up for the photo). You want the pencil lines light enough so that you can go back later and erase it. When I am drawing squares or rectangles I use a tool called a t-square. It is a drafting tool that allows you to have perfectly aligned edges. And you can read more about how to use it HERE.
So now I'm ready to stamp the scalloped border.
In order to stamp the image along the penciled line, you need to mount your stamp on an acrylic block with lines on it.
In order to stamp the image along the penciled line, you need to mount your stamp on an acrylic block with lines on it.
You will line the white line on the block with the penciled line on the paper. You might want to practice a couple of times before stamping on your project. Practice by drawing a pencil line on a scrap piece of paper and see if you can stamp your image along that line. Standing up over the stamp/block, helps you to be able to line it up. Once you are confident you have that skill down, you are ready to stamp around your guidelines. Start in the left lower corner and stamp the first 6 scallops.
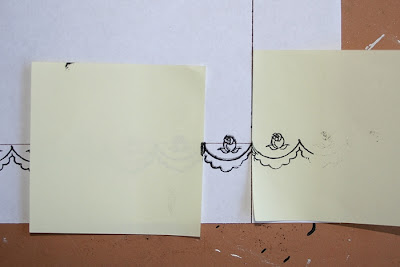
In order to stamp just one more scallop, you have to mask off the 2 ends as shown below. I know mines a little messy, but I was in a hurry to finish these tutorial photo's.
Take the post-it note mask off and stamp up the right side 6 more scallops.
Mask off 2 ends so that you can stamp 4 scallops to equal 10 up the right side.
Remove the mask and stamp 6 scallops along the top.
You will continue masking and stamping around the frame until you finish down the left side.
Here are some more details. I love using stamped images to create my own little embellishments!
Patterned Paper : Crafty Secrets, Daisy D, Flower Bazzill


5 comments:
Well, I certainly think it's beautiful, stick pin and all. I love the lace too, Melisa!
Ooops! Forgot to say how lovely the layout was too!
Beautiful card and page, the stamp set is so sweet. Lovin it girl!
Fantastic work!!! :)
I just LOVE what you've created with the baby set!! You go girl!!!
Post a Comment