Showing posts with label Manuf - Crafty Secrets. Show all posts

Tuesday, October 30, 2012

Crafty Secrets Born to Fly Birthday


Good morning stampers.  Today I'm sharing a card I created using "Born to Fly" by Crafty Secrets.  Isn't she a cutie patootie with the little the little bird nest on her head.  So many cute little elements in this set including the little tickets, flag, and butterflies.  And this set is on sale for 15.50 (reg 24.99).  


Crafty Secrets is transitioning into digital products so all their clear art stamps are on sale!  Check out what's left HERE.  They have lots of fun digital sets listed at their Etsy store HERE.  Their design team is creating some really cool inspiration using the new digital line.  

thanks for stopping by!
Melisa

*******************************************************

Project Details

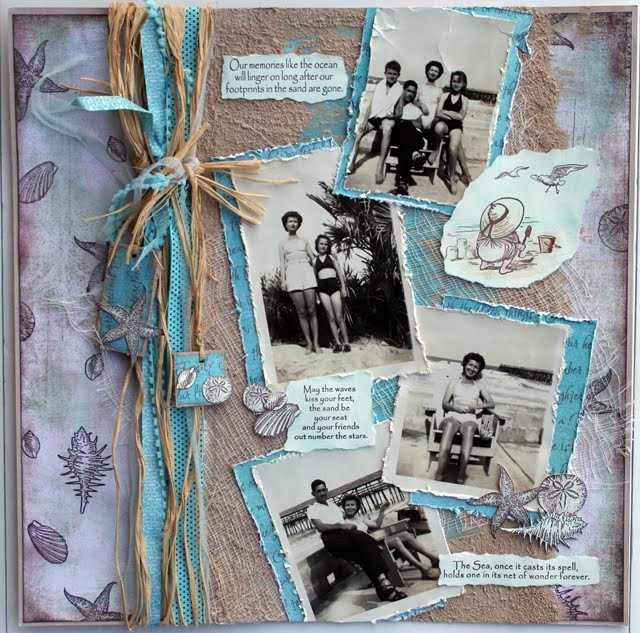
Patterned Paper :  Authentique “Essentials Collection” 6 x 6 paper pad
Flower : The Paper Studio
Gathered tuelle and pom pom trim - Joann’s
Glitter Glue : Stickles
Markers : Copic

Trim patterned paper and adhere to card front.  Adhere trim and flower.  Stamp sentiment in bottom corner.  Stamp scalloped trim, fairy girl, wand, bird, small and large butterflies, and tickets.  Color with markers, trim and adhere to card front.  Stamp banner flags, color, trim and string to create banner.  Adhere to card front.  

*******************************************************

Challenges

Paperplay (thur) - butterflies or bee's
Sugar Creek Hollow (sat) - texting vintage style ( grey patterned paper is words)
Totally Gorjuss (sat) - thing with wings
By the Cute and Girly (monthly) - birthday 


Monday, August 27, 2012

Crafty Secrets - "Sew Special"


Love these vintage sewing images by Crafty Secrets "Sew Special"!  And the safety pin and straight pins in the set are just perfect.  


********************************************

Challenges

CARD #1
Papertake Weekly (tue) - stitching or a pin
Delightful Sketches (wed) - fancy and frilly


CARD #2
Charisma Cards (thur) - lace (stamped lace)
In the Pink (thur) - wings
Paper Minutes (tue) - use one paper collection (everything used is by Colorbok)

CARD #3
Crafting for All Seasons (wed) - stitching
Stamp n' Doodle (thur) - loaded with layers  tues

*******************************************

Project Details


"Life's a Stitch"
Stamp : Crafty Secrets "Sew Special and "Artsy Banner"
Patterned Paapr / Paper Embellishments / Fabric Scalloped Border : Colorbok "Antique Paperie" from Joann's
Ink : Stampin' Up "Taken with Teal and Tsukinko "VersaFine Onyx Black"

Cover card front with patterned paper.  Stamp script border along top and bottom.  Layer paper embellishments and fabric scalloped border.  Stamp safety pin, sentiment, zig-zag stitch and dress form.


"Like a Quilt"
Stamp : Crafty Secrets "Sew Special
Patterned Paper / Paper Embellishments / Fabric Scalloped Border : Colorbok "Antique Paperie" from Joann's
Ink : Tsukinko "VersaFine Onyx Black"

Cover card front with patterned paper.  Trim roses patterned paper 2 1/2 x 3 7/8", tear along bottom and adhere to front of card.  Adhere paper embellishments as shown.  Stamp pin, butterflies, sentiment and zig-zag stitch.   Stamp lace, thread, and thimble on cream cardstock, trim and adhere to card front.


"Hem Your Blessings"
Stamp : Crafty Secrets "Material Girl" and "Sew Special" 
Patterned Paper / Paper Embellishments / Fabric Scalloped Border : Colorbok "Antique Paperie" from Joann's
Ink : Stampin' Up "Taken with Teal" and Tsukinko "VersaFine Onyx Black"
Punch : 5/8" Circle Marvy Uchida

Cover card front with patterned paper.  Adhere paper embellishments and fabric scalloped border.  Stamp sentiments and sewing machine on paper embellishment.  Stamp dress form on cream cardstock, trim and adhere.  Stamp buttons on cream cardstock, punch with 5/8" circle, and adhere.

Sunday, April 1, 2012

Crafty Secrets - Sweet Blessings

Another Easter card for you today.  This one was really easy to create using one of Crafty Secrets paper cut-outs.  Aren't those bunnies too cute!!  I stamped on the ribbon.  Are you making Easter cards this year??  I'd love to check yours out as well.  Just link me up in the comments section.
Have a great day!
Melisa
UPDATE
I'm so excited that this card was a winner over at the For Fun Challenge Blog!!  I won $15 worth of digital stamps from Clear Dollar Stamps!  Thank you!
  
For Fun Challenges


*************************************
Challenges
Sundays with Chrissy (sun)
Cupcake Craft (mon) - inspired by a song (here comes peter cottontail)
For Fun (wed)
Paper and Such ( tues)

Monday, September 26, 2011

Crafty Secrets Birdies

 
Good afternoon.  I kept this one pretty simple, not a lot of embellishments and easy to re-create.  Hope you like it!  Tomorrow I'll be back with a Christmas gift set!
Have a great day!
 
***************************************************************
 
Project Details
 
swirl - I don't know who this one is made by
Ink : VersaMagic Oasis Green Tsukineko
Momento Tuxedo Black
Prismacolor Pencils for branch
Patterned Paper : My Mind's Eye Lost & Found 12 x 12 paper pad (Hobby Lobby)
Ribbon : American Crafts
Cuttlebug Swiss Dots embossing Folder


Sunday, August 8, 2010

Crafty Secrets Wood Clipboard Albums

Good Morning Papercrafters.
Today I am sharing with you a really cool Wooden flip / clipboard Album by Crafty Secrets.  It comes with a front and back wooden covers and 2 binders rings.  And would make a really nice desk top gift for someone.  The size is 8.5" x 6".

COVER

I used Crafty Secrets Paper on both of samples.
The images on the cover and page below are from "Garden Girls" .  I created my own word collage on the cover.  The word collages on page 1 and page 2 were designed by Nina Bracket and you can get them at Squigglyfly.  Nina also creates custom signatures for your blog or for forums.  I need to get one ordered.
Lace - local craft store.  Spellbinders oval die.  Flower - Prima.
Page 1

The paper lace is really old from K&Company and the frame is Spellbinders.

Page 2

This image is from Crafty Secrets "Birdies" stamp set.


COVER

I showed this one off a while back but in case you missed it ...
The fonts used are Technique Tuesday.  This album was so fun and easy to embellish using Crafty Secrets Heartwarming Vintage Scraps "Domestic Goddess" double-sided.


Page 1

Lace - local craft store.
Deckled Scissors, Border punch - Martha Stewart.

Have a great day!

Thursday, July 29, 2010

Altered Stamp Blocks !

Good Morning.

I'm in a really chipper mood because I FINALLY finished 19 projects for 33 Dare to Get Dirty Challenges over at SCS!  This was a huge accomplishment for me because I'm so slow.  But I learned how to pick up speed and throw things pretty quick thanks to these challenges.


One of the challenges was to re-purpose.  So I did something I've done before and didn't have to put alot of thought into.  I remove all my stamps from wooden blocks, put them on cling mount, and store them by catagory in notebooks.  I have saved ALOT of the larger blocks to turn into mini pieces of art that I can sit around the house.  The original idea was to do a set for each holiday.  I'm still working on that, teehee. 


I started by selecting blocks that were different sizes and tried to figure out which 3 complimented each other.  I think these 3 worked out great.  Then I went through all my chipboard letters.  I knew I wanted each font to be different as well as a different size, so it was a matter of playing around with them to I got the combo I liked.  I have TONS of these all filed by letter, so it's not to difficult of a process.  Next I spray painted the backs and sides with black paint. 


I picked out some 7 Gypsies paper (their paper makes everything look good, right!) and trimmed it down for each block for a background.  I stamped alot of the images from this set and originally started out trying to color them with my copics, but it just wasn't working with the muted colors of this paper.  So I went with paper piecing using papers from the same paper pad.  I covered my chipboard letters with papers from the pad as well.  Just a reminder ...  the way you get the edges so smooth when altering the letters is to use Basic Grey file set along the edges.  The set comes with different shaped files for getting in small area's, holes, etc.


Once I planned out each of the layouts with the letters and paper pieced images.  I realized that I needed some more in the background.  So stamped some of the images from this set and  from the Flourishes set in the background and around the edges and that kinda brought it together.  I never know what I'm gonna end up with.  I just had a general idea of a look I wanted and started playing.

I hope this inspires you to do some playing of your own today!  Creating ART makes me so happy!

Have a great day and thanks for stopping by!

You can view all of my Altered Projects HERE

Saturday, July 3, 2010

Purr-fect Friend


Isn't this image adorable!  The girls on the Crafty Secrets Challenge thread are creating non-patriotic red, white and blue projects this week.  So I started going through my Heartwarming Vintage images and found this little cutie.  It is just one of many adorable sewing images from the from the "Sew Nice" Creative Scraps line.  Did you know that Crafty Secrets has an online store that you can order from??  HERE it is.

The bag is one of the wonderful pre-cut and pre-scored items over at Creative Cuts and More.  I just love that I don't have to do any cutting for these.  This one is the Tuck and Close #2.  This style comes in a larger size as well.
Thanks for stopping by!

Wednesday, June 2, 2010

Summertime, summertime!

Good Morning.  Well I don't know about where you are, but here in Florida things are heating up.  And summertime is definitely here.  So what better way to kick off June than with a summer project!  I used Crafty Secrets Seaside stamp set for this project.


This is a layout I created using the Seaside stamp set, last fall.  But I decided to wait for a warmer day to post it.  I had ALOT of fun with this one.  I started with distressed background paper by Basic Grey.  As you can see I stamped the shells to create my on designer paper.  I added a strip of blue down the center of the layout.  I found the perfect sheet of blue dp in one of my Crafty Secrets Paper pads to mount my photo's on.  Then I started adding elements that work well for a beach page.  If you know me, you know I love texture.  On the detailed photo's below you can see how I layered Course Pumis Gel (gritty medium found in artist section at local craft store) and cheese cloth.  Add of course I had to throw some raffia on there. 


I created my own chipboard charms to dangle.


And I embellished the rest of the layout with some of the wonderful images from the Seaside set.


Doesn't it make you want to head out to the beach??

Thanks so much for stopping by!

Friday, May 7, 2010

Crafty Secrets - Birthday Kids


This set is so cute!

Stamps : Crafty Secrets Birthday Kids
Colorization : Copic MarkersInks - Brilliance and Palette
Patterned Paper : October Afternoon
Tools : Spellbinders oval and scalloped oval dies, Fiskars border punch,
deckles scissors
Trim and punch paper as shown. Distess edges with ink. Secure all paper together as shown. Stamp images and color with Copic Markers. Secure images poppin heads up a little. Add pompom fiber.

Are you a fan of Crafty Secrets??  You can check out all my Crafty Secrets Projects HERE.

Sunday, May 2, 2010

Crafty Secrets Sew Special Set


Good Morning!  I'm so excited to share with you that I was chosen to be the Guest Designer over at ABC Toys and Crafts this week!  Don't be fooled by the name.  The tools they sell are "our kinda toys", teehee!!  You know how I love Crafty Secrets, right !??   Well, they sell Crafty Secrets and many other stamp manufacturers.  Plus lots of other cool stuff like Spellbinders, border punches, copics, ink ...
Today I'm sharing a layout and card I designed using Crafty Secrets "Sew Special".

I created my own embellishments and background DP using the stamps.  The floral DP is from one of Crafty Secrets Paper Pads.  Don't you just love the faux stitching.  Thank goodness I have faux stitching, because I would be lost on a sewing machine, teehee.  


Tip / Technique : Modeling Paste
I added some texture with a fabric swatch and some modeling paste (see the circle cluster along the bottom). It's really easy to work with the modeling paste and it adds so much texture to your work.  Lay a metal dry embossing stencil over your paper.  Use a spackling knife or old credit card to smear the modeling paste over the stencil until the holes are filled.  Clean off your knife and go across the stencil again, smoothing off the top.  Let dry.  Now just rub over with inks or paints.  You can sand it as well.   I happen to have 2 brands of modeling paste.  They both seem to work well.  The first one is by Liquitex and you can purchase it at a local craft store in the artist section.  The second is called an Embossing Paste and it is made by Dream Weaver.  Dream Weaver sells their own line of metal emobossing stencils as well.  I like doing this so much, I'm going to be on the look out for more patterns that would look good in the background of my work.


Thanks for stopping by!

Friday, February 12, 2010

Another Candy Pouch - Tree Ornament


Challenge Project for Creative Card Crew "Valentine" Challenge and another entry for Fab an Funky's Shabby Chic Challenge.


Like the one below, I designed this one as a candy pouch as well, hoping to have enough to someday hang on a Vintage Valentine Tree!  These photo's are so inspirational!


So am I crazy or what???  Anyone else have a Valentine Tree??

You can view all of my VALENTINE projects HERE.

Tuesday, February 2, 2010

Crafty Secrets Bouquet of Joy


I created this one for the Crafty Secrets Challenge Thread over at SCS.
You can check out this stamp set HERE.
PP - Making Memories

Tuesday, January 26, 2010

Shabby Chic Valentine Letterbox


I was browsing in a local Antique store and found this beat up letter box.  It's probably not "antique".  Some of the stuff in our local Antique stores look like stuff people picked up at Garage Sales and put in their booth.  But I don't like to go to Garage Sales, so I was more than happy to pay $10 for this.  I love the little ornamental pieces on it.  So I decided to embellish it for Valentine's Day.  Crafty Secrets has the most wonderful Vintage images at wonderful prices.  HERE.  There are "Booklets", "Cuts", and "Cotton Scraps".
HERE is a list of all their "Love" products.  I used some of these images to embellish my box. 


I hope you were inspired to get busy crafting and not just cards, but something you can sit out in your home and share!  Your home is your canvas!
Have a great week!

You can view all of my VALENTINE projects HERE.

Sunday, January 10, 2010

Crafty Secrets Cherish Stamp Set


12x12 Layout
I designed this vintage style layout using the "Flourishes" and "Cherish" stamp sets from Crafty Secrets.  I love their stamps and I can't wait til the new release that is coming very soon!!


Frame and Masking Tutorial
This is a close-up of the frame I built using masking tape.  If you take a look at the stamp sets, you can see that I used a couple from Cherish, but most of the frame was built using one stamp from the Flourish set and stamping it over and over, masking where needed.  I started with a penciled frame (rectangle) as guidelines on off-white cardstock.  I used the photo size to determine the size of the inside window.  I started stamping in the lower left corner and then continued up the left side, across the top, down the right side, and across the bottom.  I stamped the first image on the left lower corner of the frame and again on Eclipse Masking tape.  I trimmed the image from the Masking tape and then layed it over the same image I had just stamped on the project, masking - or protecting it.  Then I stamped the second image up the left side - "love" and again on Eclipse Masking tape.  Trimmed it and layed it over the same image on the project.  At this point I started using the one flourish image to finish the frame.  Again stamped the image on the project and again on Eclipse Masking Tape.  Trimmed it and layed it over the one on the project.  Seeing a pattern?  Here's the good news ... I can use the same flourish mask the rest of the way around the frame!  I know it's a little extra work creating the mask, but it will be worth it once you finish!  Giving you a one of a kind layout.

Now that it is all stamped, I trimmed out the inside of the frame using an exacto knife and a metal ruler.  I cut the "straight" area's first, stopping when a straight line intersected with a curved area of the image. Then I went back and trimmed around the part of the image that exteded over the pencil line.  That's how I got the unique shape on the inside and outside border.  I used a stipple brush to add red ink and distress.  I also traced around some of the swirls and inside the florals with red prismacolor pencil and blended with OMS to add some color.


2 more close-ups


I used Glimmer Chips on corners and here.  I think the patterned paper is Creative Imaginations as well.


Card
For this card I stamped the image on a Creative Imaginations Patterned Paper Frame.  I used Copics to color with.  I think the Creative Imaginations frame works great to create a romantic mood.


Thanks so much for checking out my blog!  I hope you are inspired to create this week!

Wednesday, December 9, 2009

Inchy by Inch Challenge : Chirstmas Carol

Each of these little squares are 1" x 1"


Designed using 3 inchies inspired by the "Chirstmas Carol" Challenge over at Inchy by Inch.

Stamp Set : Crafty Secrets Christmas Joy
Patterned Paper : Penny Black
Ribbon and embellishment from local craft store.
Colorization : Prismacolor Pencils with OMS

I had soooo much fun adding white and red fun flock to the scarf and holiday hat! Then I added a little glitter (stampendous prisma glitter).

Friday, October 30, 2009

Crafty Secrets Design Team Challenge!

Good Morning Ladies.
I'm very excited this morning to be participating in the Crafty Secrets DT Challenge as a Guest DT Member!  The challenge was to create something using birds.  Well the hardest part was trying to decide WHAT to use, because Crafty Secrets has lots of products with birds included.  I narrowed it down to 3 stamp sets!  teehee.   I know this post is way tooooo long and I probably should have just used one project, but I couldn't help it.  I figured you are only a Crafty Secrets Guest DT member once!!  Right!  


Make sure you check out the other DT Member links at the bottom of the post and the Crafty Secrets Blog.  I heard there was some yummy blog candy being given away at 1 of the DT blogs and by Sandy on the Crafty Secrets Blog!! 


I used the Christmas Joy stamp set on this card.  I also used paper from one of Crafty Secrets Paper Pads.
Check out the photo of the stamp set below to see how I layered the images.   I used Eclipse masking to build this scene.  You stamp the image that will be in the for-front first - bow, stamp it again on the tape, cut it out, and then cover the bow on your card before stamping the next layer.  Continue building in this manner.  I also used the holly to create a border.  Isn't this set awesome with so many possibilities.  I used it to create a layout in an early post.  If you want to see that, you can go HERE.


You can view more of my Cardboard Art HERE.

You can view more of my Collage / Mixed Media projects HERE.


I used Bird Notes on this friendship hanging decor project.  I used a swirly for the wings from the Mini Memories stamp set.  I used a swirly from the Flourishes stamp set on the corner of the bird house.  I started out with corrugated cardboard to create the bird house.  Tear off part of the surface paper to reveal the waves below, layer on acrylic paint, and glimmer mist to get the distress look.  I sprayed some white lace with glimmer mist as well and adhered to the base.  The bird dies are Spellbinders.  I have created a layout using this set in an earlier post that you can see HERE.


I used the Thanksgiving stamp set on this 2 1/2 x 3 1/2" Artist Trading Card.  I love using my stamps to create all kinds of projects, including ATC's.  I just thought this turkey and the sentiment were too cute.  The background is crackle paint distressed with some brown ink.   You could easily put this one a card as well.  To see a layout using this set go HERE.

Thanks soooo much for taking time to check out all my Crafty Secrets Projects.
To see more awesome projects in this Crafty Secrets Blog Hop and to qualify for some Blog Candy, make sure you check out the rest of the DT's Blogs.  These girls are awesome and it was so much fun to have the opportunity to play along with them!


Tune in tomorrow for my next FCD project!!
Have a great day!
Related Posts Plugin for WordPress, Blogger...