Showing posts with label Project - Banner. Show all posts

Thursday, November 21, 2013

Pink Persimmon Christmas Banner


Hello stamper's!!  Today I'm excited to share this little Christmas Banner.  I LOVE Pink Persimmon's "Big Banner with Rosettes" set and have used it in the past to create a Fall Banner and Baby Shower Banner as well.  Each flag measures 3 1/8" across x 3 5/8" top to bottom.  As soon as I seen the images in the Antiquated Collection "Winter Girl" by Lisa M. Pace ... I this set would be the perfect embellishments for a banner! 

Long post today .... but 

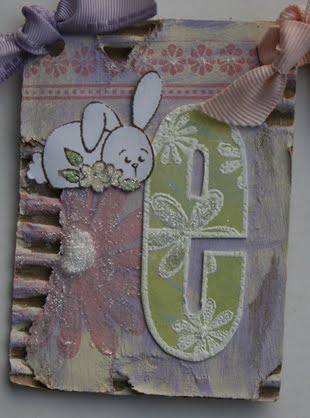
if you have never altered chipboard letters ... then make sure you don't miss the tips near the bottom of the post.


I posted a tutorial on how to create these textured leaves for this banner HERE.


You can find more inspiration using this set on  Lisa's blog and the Pink Persimmon Blog.
I used patterned paper from a 6 x 6 Christmas themed paper pad and chipboard letters I pick up at Hobby Lobby.   And that yummy lace in the background is from either Hobby Lobby, or Joann's.  Sorry I'm blanking out on the supplies today.  I'm almost certain it's from Hobby Lobby though.


Tips for altering the chipboard letters :

2 options for staring out for the first step ...
1. Place letter on back of patterned paper, trace around edges with a pencil, trim around pencil lines and adhere to letter.
2. Adhere chipboard letter to back of paper, after dry, trim around edges of chipboard letter with an exacto knife.

Either way is fine.  But the most important step to finishes off the edges so nicely is to file any excess paper using a Basic Grey Precision File tool.   I think you can get these at Hobby Lobby. Notice they have different shapes.  One is great for flat edges and others for tight corners.  Then just ink the edges with an eye shadow applicator and ink.


If you like mini banners then this set is a must have!!!
hugs, Melisa


You can check out all my Pink Persimmon Projects HERE.
and Check out all my Christmas Projects HERE.

Wednesday, May 8, 2013

Baby Shower Gift Set and Banner


Hello friends.  I know it is really such a little thing in life, but I'm a little sad because our Neighborhood Association says I have to get rid of my bird bath and possible my bird feeder (gotta give them a call about that one, not sure if it's the bird feeder or the bird feeder stand they have a problem with) in my front yard.  Both are partially hidden behind the shrubs just outside my studio window and I love seeing my little bird friends stop by to visit.  : (   What's the world coming to if you can't have a bird feeder in your front yard!  teehee.   

Has anyone been watching The Voice or Survivor???  Who are your favorites.  I don't watch a lot of tv but I do enjoy the talent oriented shows.  And yes it does take a lot of talent to be on Survivor, teehee.  I'm really upset Malcolm got voted off.  And I honestly love everyone who is left except Sherry.  

How do you even pick a winner for The Voice??   Soooooo many talented singers.  I have to say I just LOVE geek Michelle and I did take time to vote for her this week.  So glad Usher slowed her down a little and showcased that she can sing well!  I'm pulling for 16 yr old Danielle on Blake's team.  I'm having a problem picking a fav on Adam's team.  I think Amber and Judith are the best.  AND WOW!!! Shakira has the BEST team in my opinion!!   I'd have to go with Sasha or Chris if I had to choose.  Will see who stays tonight!!


Well I guess I should share a little about tonight's post, teehee!  I made this set last year and hadn't got around to posting it yet.  I LOVE Pink Persimmon's "Baby Clothesline" and "Baby Greetings" so I decided to create a little shower set.

Check out all Pink Persimmons stamp images HERE.


I also LOVE their banner sets.   They make creating your own banner really easy!


Here are a few other projects I have created using "Baby Clothesline"


Have a great night!!  I'm off to get ready for bed.  I have to be up at 4am, grrrr!  But so very thankful to have a job!
Melisa


***************************************************

Project Details

Card

Stamps : Pink Persimmon “Baby Clothesline” and “Baby Greetings”
Check out Pink Persimmon stamps HERE.
Ink : SU “Bashful Blue”, Momento “Tuxedo Black”
Patterned Paper : Deja Views “Sharon Ann Baby Collection”
Embossing Folder : Cuttlebug                 Markers : Copic
Die : Spellbinders Nestabilities “Classic Scalloped Rectangels SM”
Flower : Recollections           Deckled Scissors : Fiskars

Adhere card front to back side of brown cardstock and trim around edges with deckled scissors.  Trim patterned paper.  Cut scalloped rectangle from brown cardstock.  Trim white cardstock, emboss, and adhere to scalloped rectangle.  Adhere panel to patterned paper then wrap with tuelle.  Adhere panel to card front.  Add flower.  Stamp sentiment and hand cut into a flag.  Adhere to yellow cardstock and trim.  Stamp bear, color with markers and trim.  Stamp script background in blue ink and use with yellow cardstock to paper piece outfit.  Color trim on outfit with brown marker.  Adhere outfit, bear, and banner to card front.  

Gift Bag

Stamps : Pink Persimmon “Baby Clothesline”, “Ric Rac Circle”, and “Little Cuties”
Ink : SU “Bashful Blue”, Tsukineko “Brilliance Pearlescent Brown“, Tsukineko “VersaFine Onyx Black”  
Pearl : Martha Stewart    

Stamp ric rac circle with blue ink and trim.  Stamp ducks inside ric rac circle and on yellow cardstock in brown ink.  Trim yellow duck bodies from yellow cardstock and adhere.  Color bow with blue marker.  Stamp sentiment.  Stamp brown ink on yellow cardstock, trim, and embellish with blue pearl.  Adhere tuelle and star.

Banner

Stamps : Pink Persimmon “Big Banner with Rosettes”, “Baby Clothesline”, “Little Cuties”,  and ATC Backgrounds -“Springtime” “ Fairy Tale”, and “Spelling Bee“  
Ink : SU “Bashful Blue”, Tsukineko “Brilliance Pearlescent Brown“
Yellow cardstock : unknown       Pearl : Martha Stewart
Markers : Copic    
Chipboard Letters : Paper Studio

Stamp gingham pattern with brown ink on white cardstock.  Stamp flag image twice for each flag.  Once on white cardstock, and once over the brown gingham pattern.  Trim flags from white cardstock around the scalloped edges.  Trim along stitch line around each gingham flag and adhere to white flags. Stamp rosette with blue ink on white cardstock x 4 and trim.  Stamp star image on yellow cardstock, trim, layer onto rosette and adhere both to bottom of each flag.  Add blue pearls.   Punch holes in corners of each flag and slide onto yellow tuelle.   Paint chipboard letters yellow and adhere to flags.  Stamp ATC backgrounds with blue ink on white cardstock.  Stamp sleeper image over blue polka dot pattern, trim and color trim with brown marker.  Stamp onsie image over blue word pattern, trim and color trim with brown marker.  Stamp outfit over script background and on yellow cardstock.  Paper piece outfit together and color trim with brown marker.  Embellish banner with baby clothes.


Saturday, November 10, 2012

Fall Banner / Textured Leaf Tutorial


Hello paper crafters.   Today I want to share a fall banner I designed using  Pink Persimmon's "Big Banner with Rosettes" and "ATC Sized Background - Fairy Tale".    I'm also sharing a tutorial on how I created the leaf embellishments.  This little banner could easily be turned into a "Give Thanks" banner as well.  And .... for a casual dinner table, I think the leaf / button embellishments I made could be converted into a napkin ring holder.  


This "Big Banner" set is so awesome!!  With this set you could create a banner for every holiday.  I didn't use the rosettes this time, so you have to hop over and check them out.


I love the texture and variation of color I was able to create on my die cut leaves with an embossing folder and acrylic paint.


Thanks so much for stopping by!!
If you create a banner using "Big Banner", I'd love to see your idea's.  I will need some inspiration for future holidays!
hugs,  Melisa

Check out Pink Persimmon stamps HERE.

**********************************************************

Project Details

Stamps : "Big Banner with Rosettes" and "ATC Sized Background Fairy Tale" Pink Persimmon
Check out Pink Persimmon stamps HERE.
Patterned Paper : Scenic Route Company - banner (old) and The Paper Studio - small leaves (Hobby Lobby)
Ink : Tsukineko "Pearlescent Chocolate"
Chipboard letters : The Paper Studio (Hobby Lobby)
Wooden Buttons : Favorite Findings (one of the local craft stores)
Twine : Papertrey Ink     Ribbon : Hug Snug seam binding
Acrylic Paint :  Various Americana colors
Spray Ink : Adirondack "Sunset Orange"
Die cut leaves : large - Creative Cuts and More, small - Provo Craft (old)
Embossing Folder : Cuttlebug "Textile Texture"
File set : Basic Grey (Hobby Lobby)

Stamp flag image on patterned paper and cream cardstock.  Trim around scallops of cream flags.  Trim around stitch line of patterned paper flags and adhere to cream flags.  Stamp script image on cream cardstock.  Adhere front of chipboard fonts to back of script image.  Trim around edges with exacto-knife.  File around edges with file set tools.  Ink edges and adhere to each banner.  Emboss leaf die cuts (I started with 2 orange maple and 3 brown oak).  


The oak leaf was a dark brown.  Create more depth by layering on acrylic paint with your fingers.  I used a dark orange color here.


Add more paint. I used a cream on this one.


Here I lightly sprayed with Sunset Orange spray ink and then used a paper towel to soak some of it up.  It changed the color of the cream paint to a yellowish orange color.  


I went back over with a dark brown here and there and then ink the edges brown.  Just keep layering until you get lots of different shades.

The maple leaf was a bright orange.  I started layering paint again beginning with a dark brown and then tan. Sprayed with the Sunset Orange and blotted off with paper towel.  Then added more paint and inked the edges.

Cut smaller leaves from patterned paper and ink edges.  Paint wooden buttons with cream paint and add twine bows.  Layer leaves and buttons.  Punch holes in each end of each flag.  Thread seam binding through.  Adhere leaf embellishments.

Wednesday, October 3, 2012

Shabby Chic "CREATE" Banner


Hello paper crafters.  Today I'm sharing a banner I created using a chipboard banner kit by Maya Road  .  I purchased mine from Hobby Lobby.


I purchased the chipboard letters from Hobby Lobby as well.  


I covered the inner, triangular pieces with tissue paper and dry brushed on white paint.  After painting the letters and scalloped part of the banner, I covered them with Aleene's Tachy Glue and then sprinkled with glitter.


Hope you are inspired to make a banner of your own!!
Have a great day!
Melisa

*************************************

Challenges
The Craft Place (sun) - Make your own background (I created my background with tissue paper and paint)
Craft Your Passion - pink
Make It Monday Link Party
The Pink Elephant - banner
Papertake Weekly - anything goes
Diva's by Design - texture (I created texture with the tissue paper background and glitter)
Fab N Funky - no patterned paper


Tuesday, April 3, 2012

Rejoice / Easter Banner


Last month I shared a valentine banner you could hang across a mantel.  But you can also create table top banners.  This one was created using a chipboard bi-fold album I had in my stash from years ago.  I'm not sure if anyone still makes these, but you could make your own. 


A lot of the supplies I used are old, so I'm not going to include a detailed list this time.  But I will tell you that the beautiful cross is made by Rubber Stampede and it's called Elegant Cross.  I'm pretty sure I bought it at Hobby Lobby last year, so it may still be available.  The butterfly is Layer's of Color. "Rejoice in the miracle of Easter" is a digital image from DeeDee's digi's.


The backgrounds are all patterned paper in pastel colors and then I distressed here an there using the same cream acrylic paint I used on the chipboard letters.


"For God so loved the world ..." is also a digital image.  Most of the time, when I purchase digital images, I make the name of the shop I bought it from part of the file name.  Unfortunately I didn't with this one : ( . 


Hope you are inspired to create your own Easter banner!  I'd love to see it.

And I want to share that I am thrilled to be the guest designer for Sweet N Sassy this month!  Their April new release blog hop is this Thursday and I hope you will join us!  There will also be a party over at SCS on this thread HERE.  You will be able to participate in challenges and possibly win some stamps!!  There are some real cutie patootie's being released this month and I can't wait to share what I have designed with 2 of the new release sets! 


*****************************************
 
Challenges
 
Paper Sundaes (sun) - Easter
Stamptacular Sundays (Sun) - playing with pastels
Papertake Weekly (tues) - anything goes
Southern Girls (thur) - you got something to say??

Monday, January 30, 2012

Video Tutorial - Valentine Banner


Hello paper crafters!  Today I'm sharing a video tutorial on how to create this vintage style valentine banner.   I will be teaching you how to create the letters for the banner using a mirrow image on your computer.  You will also learn how to create the rosettes and everything else you need to know to create a valentine banner of your own!


I


I hope you like the video.  I'm still REALLY frustrated with learning how to edit.  I did the video once and then accidently erased it  : (  .  But I'm not going to give up.  I did learn a few new things this time .... like how easy it is to post the video on my blog.  I have another valentine project in the works to share with you soon.  It will be an altered heart shaped paper mache box.  I've also been working on my valentine ATC's.  Thanks so much for all your support and for checking out the video!

Have a great day!
Melisa

View more of my Banners HERE.
View more of my Valentine projects HERE.


********************************************************

Supply Details

Patterned Paper : "Truely Yours" 6x6 paper pad by Echo Park
Tuelle / beaded trim / crepe paper (party streamer) - Hobby Lobby
Pearl embellishment in center of rosette - Hero Arts  I think these are older.  I got mine at Archivers and they came in a set that had some tiny red metal roses as well.
Cardstock - Michaels
tools - Scor-Pal and Deckled Scissors (Fiskars)

*********************************************************
Challenges
Cupcake Crafts - recycle - I used cardboard to create the flags for this project
Let's Create - has a valentine theme
Stampin' With the Dragon - Anything goes
Allsorts - 1 or more hearts
JUGS - 3-D project or template with a Valentine theme
***********************************************************

Linking Parties


Nifty Thrifty Sunday @ Nifty Thrifty Things
Sundae Scoop @ A Time To Create
Sister Sunday Link Party at Sister of the Wild West
The Sunday Showcase @ Under the Table and Dreaming
Make Monday Marvelous @ C.R.A.F.T.
Made by You Mondays @ Skip to my Lou
Inspire Me Monday @ Singing Three Little Birds
Uncommonly Yours @ Uncommon Designs Online
Whatever You Want Wednesday @ Free Pretty Things
WOW Me Wednesday @ Gingersnaps Crafts
A Crafty Soiree @ Katie's Nesting Spot
Watcha Got Weekend @ Lolly Jane Boutique
Show and Tell Friday @ My Romantic Home
Feathered Nest Friday @ French Country Cottage
Strut Your Stuff Saturday @ Six Sister' Stuff
Check Me Out Saturday @ A Vision to Remember

Sunday, March 28, 2010

Hear comes Peter Cottentail !

Easter is right around the corner, so I thought I had better get some cards done and in the mail.  


Tip : Stamping on Ribbon
Well not much of an explanation needed.  But my tip is to use a juicy pigment ink.  I used Brilliance Pearlescent Chocolate on the pink ribbon above.  I love the Brilliance line of inks for a pigment ink.  I also use VersaMagic.


Here is an Easter tin I made last year.


Tip : Altering a vegtable can
So inexpensive to make.  It's actually a vegtable can.  Squeeze the sides together slightly to make it longer at the top.  I sprayed it with this yummy brown texture spray paint.  Then smeared on a little pink acrylic paint.  I used my Crop-a-dile to punch holes in the side.  I painted wooden beads and threaded them on some brown craft wire.  I twisted the wire down both sides of the beads and attached through the holes on the sides.   It would be even cuter if you added some wooden balls at the bottom to create feet!
 
Here is an Easter Banner I made last year and posted over on my TAC blog.


Tip : Cardboard Art
The entire project is acrylic paints, stamps, punches and ink.  I used cardboard, tore off parts of the front to reveal the riples. I painted the backgrounds of each panel with layers of acrylic paints. Messy and fun!!
The Easter set I used on the tin and the banner  is No Bunny Like You by TAC.  All the florals are various TAC sets as well.  The font is Big Timber by Technique Tuesday.  This has always been one of my favorite TT sets because it's open.  So you can stamp it on any type of pattered paper and you have a perfect match for a layout.  Or stamp a pattern and then the letter over that. 
I hope this gets you in the mood to create something fun for Easter!

You can view more of my Cardboard Art HERE.

You can view more of my Collage / Mixed Media projects HERE.
Related Posts Plugin for WordPress, Blogger...