Showing posts with label Theme - Christmas. Show all posts

Sunday, December 1, 2013

Gingerbread House Mini-Album


Cover
So I decided to break up the monotony of all cards and post a mini-album. 

Good morning scrapbookers.  Today I'm sharing a Gingerbread House album I created a about 2 years ago .... but I enjoyed it so much .... I wanted to share it with you again since I have some new followers.

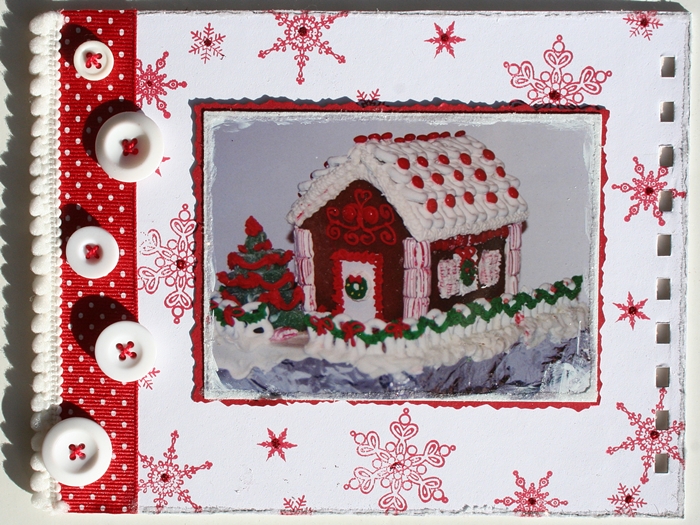
When my children were growing up we used to make Gingerbread houses as part of our Christmas activities.  Some years we used the standard store bought houses.  But we were pretty serious and some years made our own gingerbread dough so we could be creative.  My kids came up with some crazy stuff over the years (you don't want to miss the army tank my son created below.  Hard to see in the photo .... but he has a candy Santa in front of it).    

I miss doing fun activities like this with my children.  They grow up so fast.
fondly reminiscing,
Melisa


*********************************************************

Project Details

Gingerbread Chipboard Album Kit : Creative Cuts and More


Cover

I used a few stamps and some mini Christmas ornaments from Hobby Lobby to embellish most of my album.

The cover was stamped in snow flakes.  First with VersaMark Ink and white embossing powder.  Then with Glue Pad and sprinkled with red glitter.  Because the glitter will not stick long term, I sprayed the background with several coats of Matte Fixative Spray.  The cute gingerbread man is a cute die-cut by Creative Cuts and More.  I used white paint for the icing lines and the pepperment is my pepperment stamp with the ends cut off.  The brick on the house is Layers of Color's "Brick Wall" cling art stamp colored with Copics.  The peppermint sticks on the house corners and chimney are handmade.  I used my T-Square to draw a series of lines, and then cut at an angle to create the diagonal look. Trace the openings of the window and door on white cardstock, cut openings out, and then trim around with deckled scissors.  Adhere around door and windows.  Add glitter using a 2-Way glue pen.  The swirly on the roof is May Road, painted white and covered in glitter.  The stocking button is a Dress It Up button purchased from Michaels.  I added fabric filler/padding on the side of the roof, applied Aleene's Tachy Glue, and sprinkled with glitter.  I painted the chipboard trim with white paint, applied white glue, and sprinkled with glitter.  The candy peppermints were handstamped, colored with Copics, and hand cut.  If you do not have a similar stamp, then consider using a pattern from a coloring book off the internet.  HERE.


 Pages 1 & 2

I was able to find some snow flakes, candy cane border, and peppermint stamps in my stash. They are all old, so I can't link you. I think the candy cane border and peppermint candy stamps were inexpensive stamps from the dollar bin at Michaels years back.

 Page 1

The 2 mini gingerbread die's are from CCM as well. 
I was able to find a peppermint border stamp HERE.  But you can also consider searching for a digital stamp or coloring book image as well.  I added white acrylic paint around the edges of all photo's.  Glitter was added to each around the edges after doodling.   I found the cutest poem that a teacher used on a bulletin board HERE.

Page 2

Embellish the inside of snowflakes with red Stickles. 
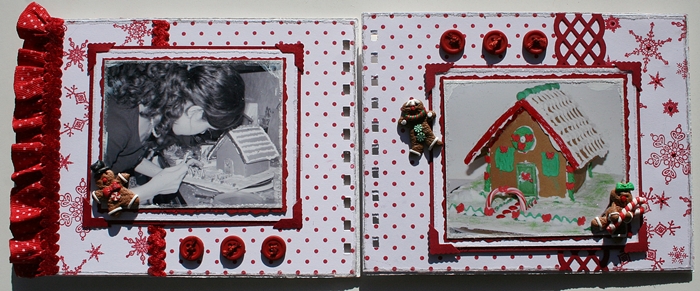

 Pages 3 & 4

I used a large polka dot background stamp on page 3.  And I found these cutie patootie gingerbread buttons at a local craft store.  They are called "Iced Cookie Gingerbread Men" by Dress It Up (Michaels).  Check out the buttons I found HERE that would be perfect for your album.  And check out the buttons for sale on this blog ...  scroll down to Oct 27th  HERE.

 Page 3


Page 4

I added pocket pages in my album.  I cut a sheet of cardstock 5 3/4" x 11" and then scored at 5 1/2".  The opening is along the side with the green scallops.  So I can tuck in some tags with journaling.  So page 4 is only 5 1/2" long and therefore you can see part of page 6.  I wanted to include gingerbread dough and icing recipes.  What you can't see is there is actually a second pocket page underneath this one and on the outside of the front and backs are the instrutions for preparing the dough and icing.

 Page 5 & 6

 Page 6

Page 6 includes some mini-ornaments found at Hobby Lobby.  They have 2 sections this year including gingerbread ornaments.  One is a mini tree section and then again in the large ornament section.  There were little hooks in the top that I unscrewed and removed.

 Pages 7 & 8

More mini ornaments on these 2 pages.  The edger punch on page 8 is by EK Success. This is not a traditional border punch.  It creates a paper ribbon.

 Page 7

 Page 8

 Pages 9 & 10

I used a large background stamp on these 2 pages.  The stamp is by Inkadinkado.

 Page 9

Yes that's an army tank shooting Santa!  I really wanted my kids to create houses with traditional christmas colors, but they wanted to do there own thing, and this is just one example.  Sometimes their creative idea's worked and sometimes they didn't.  One year my son and his girlfriend decided to do a "Disney" themed house.  They tried to build a roller coaster coming off the roof!  It all looked great, except the roller coaster didn't work out.

Page 10

The holly embellishments in the corners are by Favorite Findings (Michaels).

Page 11 & 12


Page 11


Page 12

The chipboard candy canes used on the roof are from Creative Cuts and More.  I painted them white, added lines with a Micron pen, and colored strips with a marker.  I crisscrossed 2 of them and embellished with the holly button.


Saturday, November 30, 2013

Pink Persimmon's "Antiquated Collection - Christmas Girl" and "Holiday Hello"


Hope you had a fabulous Thanksgiving.  Are you a black friday shopper??  Not me.  I hate the crowds.  There will be tons of sales after black friday as well.  

Today's project features Pink Persimmon's  "Antiquated Collection - Winter Girl" (sentiment and leaves) and "Parcel Post".  I used some chipboard on this one.  I found a little bag of chipboard in the $1.50 section at Michaels earlier this year and the bird is from that set.  I love checking that section.  You never know when you will find a great deal.  I painted the chipboard bird blue, added a little cream with my finger, and brown to distress it.  The flourish is by Maya Road.


This on features "Holiday Hello" by Pink Persimmon.  I paper pieced the coat and hat and colored the rest with Copic Markers.

See you tomorrow for more Christmas Card idea's!
hugs, Melisa

Wednesday, November 27, 2013

Shabby Chic Christmas cards and tag


Well I hope you didn't wait til today to do your shopping for Thanksgiving.  It's going to be crazy in the grocery stores.  We actually celebrated Thanksgiving on Halloween this year while my daughter and boyfriend were visiting from Colorado.  It doesn't matter what day you do it on.  For us it was about recapturing some of that family time cooking in the kitchen together, singing Christmas carols, and just enjoying being together.  I treasure those moments even more since my children are grown now.  We stopped at putting up the Christmas tree though.  It was just way too early for that.  I miss having my girl with me every Thanksgiving, it's just not the same with out her.  I hope you enjoying your family's as well this year!

Today's project ...

LOVE this color combo and I'm hoping to make lots more of these cards to mail out while I'm on my trip to Georgia this week.  Here's the problem.  I don't have any more of that lace, trim or the sentiment.  So if I can find suitable substitutes .... some of you may be seeing this one show up in your mail box.  This one is designed using Hero Arts "Branch and Flourish".  I think I picked this one up at Michaels a few month's ago.

I love sending cards.  I can't make any promised because I'm not sure how many cards I will get done on my trip ... but if I don't already have your address and you would like to receive a Christmas card from me :
Email me your address and birthday to luv_2_stamp@yahoo.com


I design this one using a retired set by Gina K. Designs.  But another image I can see on this layout is a large deer in green ink, leaping across, above the sentiment.
Like these :
"Christmas Silhouettes" (I've seen this one at local craft stores)

Or even better .... look what I found :

Waltzing Mouse's "Vintage Ornaments"


and here is a Christmas tag using "A Very Merry Christmas"

Check out all the details below.

I'm going to take a break from the daily inspiration for Thanksgiving but will be back with more to share Nov. 30th.  See ya then!
hugs, Melisa

*****************************************************************

Christmas Blessings - 4.25” x 5.5”

Stamp : Hero Arts
Ink : Glimmer Mist “Piece of My Heart”, Momento “Bamboo Leaves”, Tsukineko “Pearlescent Chocolate”
Dies : Spellbinders, Cheery Lynn Designs
Embossing Folder - Cuttlebug
Punch : Martha Stewart
Sentiment : Flower Soft
Flower : Offray

Trim cream cardstock, emboss, ink and adhere to card front. 
Die cut doily from tissue paper and spray with ink.  Die cut label,
emboss, and ink.  Stamp tree, trim and ink.  Adhere doily, lace
trim, label, and tree to card front.  Punch snow flakes and ink. 
Spray trim.  Adhere trim, snow flakes, sentiment, and flower
to card front.

Merry Christmas - 4.25” x 5.5”

Stamps : Gina K. Designs
Ink : Glimmer Mist “Piece of My Heart”, Momento “Bamboo Leaves”, Tsukineko “Pearlsecent Chocolate”
Dies : Spellbinders, Cheery Lynn Designs
Embossing Folder : The Paper Studio
Sentiment : Flower Soft 
Flower : Offray

Trim cream card stock a little smaller than card front, emboss,
and ink. Die cut doily with tissue paper and spray with ink. 
Die cut label from cream card stock, emboss, and ink edges. 
Adhere card stock panel, doily, label, lace trim to card front. Stamp ornament images, trim, and ink edges. Adhere images, inked trim, sentiment, and flower to card front.

Season’s Greetings Tag - 2 ¼” x 4 ¼”
Stamps : Gina K. Designs
Doily : Joann’s Fabric
Ink : Tsukineko “Pearlescent Chocolate”, Glimmer Mist Spray Ink, Momento “Bamboo Leaves”
Dove Blender Pen     Ribbon and Flower : Offray
Punch : Martha Stewart          Sentiment : Flower Soft
Embossing Folder : Cuttlebug

Cut tag from cream card stock, emboss and ink.  Spray
paper doily.  Stamp image on book paper, color with inks
and Dove Blender Pen, and trim.  Punch snow flakes and ink. 
Layer all elements.  Tie ribbon and adhere.

Tuesday, November 26, 2013

The Cutting Cafe / GinaK Joy Word Shaped Card


Hello friends.  Today's Christmas card was actually featured in the November issue of Paper Crafts Magazine.  It was designed using The Cutting Cafe's "Joy Word Shaped Card" (comes in a PDF for hand cutting or WPC / SVG if you have one of those fancy cuttin' machines) and embellished using one of the images from Gina K. Designs "A Very Merry Christmas". 

I love sending cards.  I can't make any promised because I'm not sure how many cards I will get done on my trip ... but if I don't already have your address and you would like to receive a Christmas card from me :
Email me your address and birthday to luv_2_stamp@yahoo.com

More Christmas card inspiration tomorrow.
thanks for stopping by!   Melisa

You can check out all my Gina K. Designs projects HERE.
You can check out all my Cutting Cafe projects HERE.
You can check out all my Christmas projects HERE.

Monday, November 25, 2013

Sweet n' Sassy's "Christmas Joy"


Day 2 of my daily post with Christmas card inspiration using some of my favorite stamp images. This one is designed using "Christmas Joy" by Sweet n' Sassy.  This one would be pretty quick and easy to put together.  I cut the doily from tissue paper using "Nautical Wheeler Doily" by Cheery Lynn Designs.  This may become one of my all- time most used dies.  LOVE doily's.  I colored the the bird using R29, R46, and R89.  I used E23, E25, and E19 for the branch / pine cone.  I added a little Stickles to the branch and pine cone to create a little snow.

I love sending cards.  I can't make any promised because I'm not sure how many cards I will get done on my trip ... but if I don't already have your address and you would like to receive a Christmas card from me :
Email me your address and birthday to luv_2_stamp@yahoo.com

I will be back tomorrow with another Christmas card.
Thanks for stopping by!
hugs, Melisa

You can check out all my Sweet n' Sassy projects HERE.
You can check out all my Christmas projects HERE.


Sunday, November 24, 2013

Pink Persimmon's "Christmas House"


Good morning friends.  Do you have your Christmas cards ready to mail out??  I'm planning to get more done on our trip to Georgia this week.   If you need some inspiration, then stay tuned .... I have a lot of Christmas cards to share with you in upcoming post.  I''m going to try and do daily post for the next week.
  
Today's card features the "Christmas House" stamp set released a few weeks ago by Pink Persimmon.  The main image is all one stamp.  I just stamped it in different colors and paper pieced it.  If you are not familiar with that term you can see a step by step tutorial of another project created with this image and paper pieced HERE.  I used the script image from  "Fairy Tale" on the background and the "Soda Pop Alpha" for the "25"

I wanted the snow flakes to look vintage ... so I wiped distress ink onto white vellum.  That took a while to dry, then punched snow flakes using Martha Stewart's punches (the mini tag punch is Martha Stewart as well).  That was a big pain in the patootie because some of the pieces snagged since I was using vellum.  I love the look ... but now sure I will be trying to punch vellum with a detailed punch anytime in the future.  The vintage looking button is "Dress It Up's Heirloom Collection" from Hobby Lobby.  

Have a great day!
hugs, Melisa

Thursday, November 21, 2013

Pink Persimmon Christmas Banner


Hello stamper's!!  Today I'm excited to share this little Christmas Banner.  I LOVE Pink Persimmon's "Big Banner with Rosettes" set and have used it in the past to create a Fall Banner and Baby Shower Banner as well.  Each flag measures 3 1/8" across x 3 5/8" top to bottom.  As soon as I seen the images in the Antiquated Collection "Winter Girl" by Lisa M. Pace ... I this set would be the perfect embellishments for a banner! 

Long post today .... but 

if you have never altered chipboard letters ... then make sure you don't miss the tips near the bottom of the post.


I posted a tutorial on how to create these textured leaves for this banner HERE.


You can find more inspiration using this set on  Lisa's blog and the Pink Persimmon Blog.
I used patterned paper from a 6 x 6 Christmas themed paper pad and chipboard letters I pick up at Hobby Lobby.   And that yummy lace in the background is from either Hobby Lobby, or Joann's.  Sorry I'm blanking out on the supplies today.  I'm almost certain it's from Hobby Lobby though.


Tips for altering the chipboard letters :

2 options for staring out for the first step ...
1. Place letter on back of patterned paper, trace around edges with a pencil, trim around pencil lines and adhere to letter.
2. Adhere chipboard letter to back of paper, after dry, trim around edges of chipboard letter with an exacto knife.

Either way is fine.  But the most important step to finishes off the edges so nicely is to file any excess paper using a Basic Grey Precision File tool.   I think you can get these at Hobby Lobby. Notice they have different shapes.  One is great for flat edges and others for tight corners.  Then just ink the edges with an eye shadow applicator and ink.


If you like mini banners then this set is a must have!!!
hugs, Melisa


You can check out all my Pink Persimmon Projects HERE.
and Check out all my Christmas Projects HERE.

Wednesday, November 6, 2013

Check out Pink Persimmon's NEW CHRISTMAS STAMPS!


I'm sooooo excited to share that not only does Pink Persimmon have a new online store that is fabulous .... but they have started releasing some of the new images.  I am so blessed to get to work with them and I can't wait to show all the new projects I've designed.  THANK YOU Darcy and Judy!

Today I'm sharing a project designed using Christmas House.  Hop over and check it out ... it comes with the cutest little carriage image as well.  Today's post is a Holiday Shadow Box Home Decor project with a step by step tutorial for you.


CREATING THE SHADOW BOX


Trim cream cardstock 4 1/2" x 4 1/2".  Score 1/4" and 1/2" from edge of each side as shown by dotted lines.


Trim each corner as shown above.


Fold along score lines as shown.


Adhere flaps together.

***************************************************************

CREATING THE STAMPED PANEL

Next you need to stamp and paper piece the image panel to fit inside the shadow box window.  


In the photo above I mask the stars with masking tape because I didn't want to stamp them in green and my stamp pad was so large that there was no way I could stamp the tree's green and stars yellow without over lapping.  If you choose to use markers, then you can color them separately and stamp them at the same time.


Stamp Panel #1 with the image in green on cream cardstock 3 3/8" x 3 3/8".  
Stamp the image again in brown and red on smaller pieces of cardstock, as shown above.  
Stamp image on masking tape as well.  I use Eclipse Masking Tape.


Trim mask and cover image on Panel #1 (the one with the green tree's).
Lightly and randomly apply brown ink to a script background stamp image.  Another way to do is to apply the brown ink heavy then stamp it off on a piece of scrap paper then immediately stamp on Panel #1.  It's not shown in the photo below ... but do the same thing to the "hill" as well.


Remove mask.  I did this one for the tutorial quickly.  I don't like how this one turned out,  See the gap between the trees and brown ink???  It's way to big and would have re-done this one if I were using it.  But you get the idea.

I actually forgot this step on mine so it's not in the photo above.  Now would be a could time to ink the stars with gold ink and stamp on to Panel #1.  Since I forgot I had to stamp mine separately, trim them and then adhere.  Trust me you don't want to do it that way.


Trim the house and hill as shown.


Paper piece the 3.  Use pop dots to layer the house and hill over Panel #1.  Ink edges with brown ink.  Use chalk or a Dove Blender Pen to color in Trees.  The Dove Blender is great because you can use the ink you stamped the tree's with and because it's "water downed" with whatever they put in it ... it's a little lighter.  Just pick up a little ink on the pen and rub in on.  The sample below is with chalk.  See how it doesn't match that well.  I actually ended up re-doing it after I snapped that photo and used the Dove Blender on the sample at the top.  I have Dove Blender Pen's for each color .... green, red, yellow, blue, pink, etc.   LOVE them.


Mount Panel #1 on red patterned paper.  Adhere inside shadow box.  
Trim a piece of green patterned paper 6" x 6".  Trim a window out of the center of the green panel.  You want to be slightly smaller than the inside of the shadow box opening so that the cream doesn't show.  The inside of your shadow box should be 4" x 4" ... so trim the window from the green patterned paper about 3 7/8" x 3 7/8".  Ink the edges.  Adhere the shadow box to the back of the green patterned paper.  Wrap the top with cream ribbon.  Use a border punch to create a decorative border from red patterned paper and adhere around outside of edge.   Embellish.  Stamp sentiment, trim and adhere.

The last step is to adhere the shadow box to one of those little wooden easels you can get at the local craft stores in the art section.  You can see the feet of mine sticking out a little with the first photo.  Looking at it now I think I need to go back and paint those feet cream.

Hope this little tutorial inspires you to create a little home decor project of your own!

big hugs!
Melisa


You can check out all of my Pink Persimmon projects HERE.


Related Posts Plugin for WordPress, Blogger...