Hello paper crafters! Today I am sharing a 12 x 12 layout I designed using Pink Persimmon's new release stamp set "Style Girl"! I really have been trying to use up my old scrapbook supplies, but I made a trip to my local scrapbook store recently (Archiver's), and couldn't resist some of the new My Mind's Eye. The Sweetest Thing line is truely sweet!!
I used some old photo's of an aunt (my mom's sister) for this layout.
Growing up I thought she was so cool! She didn't have kids of her own, so my brothers and I were very special to her. She was always laughing and joking with us. A sweet and loving women who died way to young. I think if she had lived to her sixties she would have still had a youthful and joyous approach to life. It's just who she was.
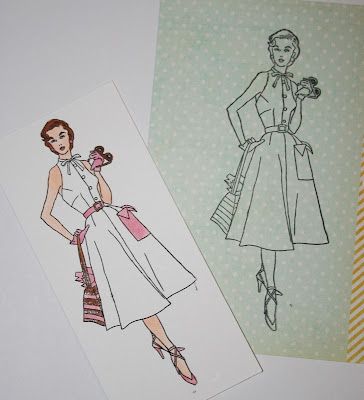
I paper pieced my Style Girl images. Stamp the image on patterned paper and on white cardstock. Color as shown with markers.
Trim as shown. Hard to see in the photo, but along the left side I trimmed around the hand bag by cutting into the dress to leave a little white cardstock to tuck behind the patterned paper skirt. You can get away with not cutting around the handbag like that, but I had to trim the white out above it and around the hand on the hip, so it was just easier to cut out if I cut the handbag a well. Layer the skirt and then adhere the white side of the hand bag to the back, and the thumb on top of the patterned paper skirt. Adhere the pocket. Adhere the top of the dress. Color collar / bow and buttons. The second girl was paper pieced the same way.
I hope you will stop back by on Thursday for a background tutorial
Thanks so much for stopping by and have a blessed day!!
Melisa
Check out Pink Persimmon stamps HERE.
You can check out all my Scrapbook Layouts HERE
You can view my Mini-Albums HERE.
You can check out all my Pink Persimmon projects HERE.
****************************************
Project Details
Patterned Paper and Cardstock Embellishments : My Mind's Eye "The Sweetest Thing" by Jen Allyson
I used a sheet from the 6 x 6 paper pad for the doily and dresses
I used a sheet from the 6 x 6 paper pad for the doily and dresses
Die : "French Pastry Doily" by Cheery Lynn Designs
Tag : Donna Downey
buttons and lace : unknown
Markers : Copics E000 / E00 / R00 (skin), RV11 / R85 (pinks), E23 / 25 (browns)
***************************************
Challenges
My Mind's Eye - Use stamping with your My Mind's Eye products
The Paper Girls Challenge is a photo inspiration. I used colors in the photo on my layout.

Catered Crop (sun) - use circles ( I have lots of circles in my doily, buttons, and paper embellishments )
deadline Oct 27th 8pm
Red Carpet Studio (sun) - is looking for a Scrapbook Layout with polka dots, circles or a ring (I have polka dots on the paper pieced dress and some of the paper emblishments as well as circular elements)
deadline Oct 27th 11pm
Cupcake Craft Challenge (mon) - paper piecing
Make it Monday - anything goes every week
Ink Impressions (wed) - anything but a card
Ladybug Crafts (wed) - favorite embellishment (my favorite embellishment is to create my own using my stamps and my second choice is lace / trim )
Let's Craft and Create (wed) - add dimension
deadline Oct 30th 6pm CST (they are in the UK)
Word Art Wednesday - "Every good gift and perfect gift is from above, and comes down from the Father of lights" James 1:17 ( My family is the greatest gift my heavenly Father could have ever given me. I'm hoping He will bless us with some additions so I can be a grandma someday. That would be one of the biggest blessings of all!!)
Oozak's (monthly) - die cuts (I used my doily die)
Markers : Copics E000 / E00 / R00 (skin), RV11 / R85 (pinks), E23 / 25 (browns)
***************************************
Challenges
My Mind's Eye - Use stamping with your My Mind's Eye products
The Paper Girls Challenge is a photo inspiration. I used colors in the photo on my layout.
Catered Crop (sun) - use circles ( I have lots of circles in my doily, buttons, and paper embellishments )
deadline Oct 27th 8pm
Red Carpet Studio (sun) - is looking for a Scrapbook Layout with polka dots, circles or a ring (I have polka dots on the paper pieced dress and some of the paper emblishments as well as circular elements)
deadline Oct 27th 11pm
Cupcake Craft Challenge (mon) - paper piecing
Make it Monday - anything goes every week
Ink Impressions (wed) - anything but a card
Ladybug Crafts (wed) - favorite embellishment (my favorite embellishment is to create my own using my stamps and my second choice is lace / trim )
Let's Craft and Create (wed) - add dimension
deadline Oct 30th 6pm CST (they are in the UK)
Word Art Wednesday - "Every good gift and perfect gift is from above, and comes down from the Father of lights" James 1:17 ( My family is the greatest gift my heavenly Father could have ever given me. I'm hoping He will bless us with some additions so I can be a grandma someday. That would be one of the biggest blessings of all!!)
Oozak's (monthly) - die cuts (I used my doily die)


