Showing posts with label Altered Projects. Show all posts

Saturday, February 9, 2013

Mini Album #5 : Altered Lunch Pails - Doggy Diary's


Hello Paper Crafters.  I have soooo many projects from way back when I wasn't blogging that I would like to gradually work into my blog and this is just one of them!  

These are some of my all time favorite projects featuring our pups.
My husband and I each got a pup when we turned 40.  Our kids were growing up and didn't seem to need us as much, so we wanted more babies, without the bottles and diapers, teehee.  So I had this idea to create them doggy diaries.  And the Basic Grey lunch pails were really big back then.  The idea was that I would store, their breed papers, vet records, and favorite photo's in them.


Ok I admit it.  I have a slightly unhealthy relationship with my pups.  I adore them.  They have never been boarded.  I have a rule, that if the dogs can't go, I don't go, teehee.  With the exception of 1 time, either my husband and I have been with them over night.  Only once have we went away and left them with someone else, daughter, and I called frequently.


And of course I needed a few accesories to go along with them!


Boy is this a bad photo.  It was taken years ago.


If you have pups, I hope you are inspired to create your own special doggy diaries!
Melisa


You can view all of my Altered Projects HERE

Saturday, November 24, 2012

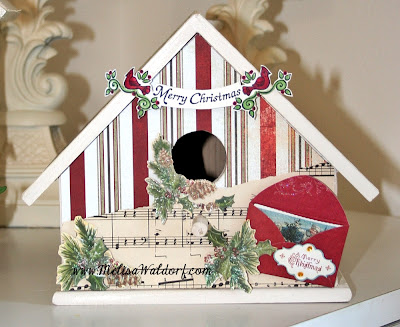
Altered Christmas Birdhouses


Good morning paper crafters!  Hope you all had a fabulous Thanksgiving.  We had our son and his girlfriend over and really enjoyed spending time with them.  Here's a photo ....


I don't know about you ... but I"m still stuffed from all the food we ate.  We cooked on Friday instead of Thursday so the kids could spend Thursday with Jenna's family.  I tried a new recipe this year ... pumpkin cake.  I don't eat pie and we have always had pumpkin pie in the past.  So I thought a pumpkin cake would be a good idea .... or was it .... I can't stop eating it, teehee.   Now we are taking all the fall decor down and getting the Christmas decor up.


So today I want to share some altered Christmas birdhouses I created.  

I have a detailed step by step tutorial on how I created one of them posted with my Altered Valentine birdhouses HERE.  


All the patterned paper is from my stash.  A lot of the cardboard embellishments I used are from K& Company from last year.  The Holly Flourish die I used above is by Cheery Lynn Designs.  The birds used on the first 3 houses are stamp images.


The word "peace" above is by Maya Road and these chipboard Christmas Words are still available HERE.


Hope you are inspired to create some altered birdhouses of your own!
hugs, Melisa


Sunday, September 16, 2012

Mini Album #7 : So Thankful Altered Altoid Tin


Hello paper crafters.   I realized I had not posted since Aug 31st!  Boy does time fly.  Did I mention I started a new job??  I'm working more hours than I had been and it's really interferring with my creative mojo.  So after a long week, I decided I needed some shopping therapy.    I made the long drive to my not so local scrapbook store on Saturday - Archivers.  I hadn't been to one in greater than 6 months because they are all 50 min away.  So most my shopping has been online or at my local craft stores (Michaels, Hobby Lobby, and Joann's).  I was like a kid in a candy store!!  It was a little overwhelming though because I was trying to select things for so many different things, since I don't go that often.  I'm trying to do more scrapbooking, and I wanted to pick up some supplies to create a few Pink Persimmon projects.  As well as some things to use for future pub calls.  I was in there for hours!  


So tonight I wanted to share this little altered altoid tin I have had forever ... but never posted.  The supplies are so old, I'm not even going to list them.  But hopefully you can still get some inspiration from it.  In the photo above, you can see to strips of ribbon coming out of the tin.  these are adhered across the back of the last page and can be tied together in a bow.  I use them to lift the album out of the tin.


I'm also going to post a step by step tutorial on "how to alter an altoid tin".  So this will be a long one!


So basically, I cut lots of little mini pages with rounded corners.  I used strips of cardstock to "hold or bind" the pages together.  


After adhering the strips to the back side of the front of the pages you can see in the photo's, I covered the backs of each page and the binding strips with another page.  


Then I embellished each page with little pockets and pages that flip up exposing more photo's. 


I used decorative scissors, stamps, and flower punches to embellish my little album.


You can view all of my Altered Projects HERE
You can view all of my Mini - Albums HERE.
You can view all of my Fall Projects HERE.

Thanks for letting me share!
Have a great week!
Melisa


***********************************************

Altering an Altoid Tin

In the past I have altered quite a few altoid tins.  I just thought they made the cutest little mini-albums and the tin protected the mini-album so well.  I actually created a template for the top of the lid, so I can quickly trace and cut those round corners.  After I made one out of paper, I converted it to chipboard.  I have another altered tin tutorial that shows you how to stamp on tissue paper.  It's actually a little bigger.  It's one of the gift tins from Michaels.  You can check out the step by step tutorial for that one HERE.


For this particular project I sanded down the edges of the tin.  


I rubbed black Staz-on ink around the edges.  


Trimmed out pattered paper for the top and bottom by sitting it on the back of the patterned paper, tracing around the edges with a pencil and then trimming a little inside that pencil line.  I also cut strips of paper to cover the sides by wrapping it around the tin.  I inked all the edges then used Mod Podge to adhere all the paper to the tin.  Easy!!  


Saturday, August 11, 2012

Mixed Media : Altered Stamp Blocks


3 Houses
Last post I shared with you that I remove the rubber images from the wooden stamp blocks and remount them on cling so I can organize all my stamps in notebooks by catagory.  Well over the years I have saved up various sizes of the wooden blocks with the plan to re-purpose them into little works of art.  This is my fourth altered stamp block project.  There is a link at the bottom of the post, if you would like to check out the other 3.


I started with 6 rectangular stamp blocks.  3 for the bases and 3 for the roofs.  I had my husband cut 3 of the rectangular blocks into triangles to create my roofs.  Next I  spray painted the blocks.  I adhered the roofs on with Aleene's Tachy Glue.  The flower centers were made with clay and tissue paper.  I shaped a round disc with a dip in the middle from air-dry paper clay.  After dried, I wrapped it with tissue paper.


If you are interested in buying a set like this, email me.  (luv_2_stamp@yahoo.com) .


I couldn't find enough coordinating pattern paper in my stash, so I decided to create my own "text" patterned paper using a font that looks like it came from a typewriter.  Read more about how I created my "text" patterned paper below.  I used a free download from dafont.com called "Mom's Typewriter".


Creating your own text patterned paper
I had saved a list of quotes I found here and there that I thought would look good on ATC's or other Mixed Media projects and I just typed those up and then repeated them.  After printing my "text" patterned paper, I sprayed it with Krylon's Matte Finish "Workable Fixative".  Not sure I even needed it.  Heat setting with my heat tool may have been enough, but I was in a hurry and didn't want to risk the ink smearing.  I use Epson ink.    I used as little water as possible to add color.  I used Neocolor Watercolor Crayons for the pink and blue, and some Loew-Cornell watercolor paint for the yellow.  Doesn't matter what you use, those just happened to be the water color mediums that coordinated with the other ink / patterned paper colors I was using.  After the paper was dry, I cut pieces to fit my roofs.  I punched some circles from a sheet that was not colored, positioning the punch to focus on specific words.  Then I colored around the words and doodled.

You can view all of my Altered Projects HERE.
You can check out all of my Altered Stamp Block projects HERE.
You can check out all my Mixed Media style projects HERE.

Thanks so much for stopping by and I hope you are inspired to alter some stamp blocks of your own!
hugs, Melisa

This project was select as a trigger target over at Moxie Fab!!

Preview

*****************************************************

CHALLENGES

Moxie Fab - Hope this one is ok Cath.  I used a typewriter font to create my own patterned paper.


Link Parties :


Dear Creatives


SixSistersStuff.com
Come "Strut Your Stuff" with us


Feather Your Nest Friday


Show and Tell Friday @ My Romantic Home


Katie's Nesting Spot


It's Overflowing


I Heart Nap Time

Ladybird Ln

Saturday Spotlight @ Craft Envy


Lovely Crafty Home


What I Whipped up Wednesday @ Sugar and Dots


Make it Monday 


Making Monday Marvelous
HERE


HERE

A Marvelous Mess
HERE


 *********************************************************

Stamp Credits

House #1
Doily's - My Mind's Eyes
Butterflies on roof  - Hampton Arts
2 blue butterflies - Cornish Heritage Farms

House #2
Collage with butterfly - Hampton Arts
Key - Lost Coast Designs
Measuring Tape - Paper Artsy

House #3
Lock - Lost Coast Designs
Butterfly - Layers of Color

Related Posts Plugin for WordPress, Blogger...