Showing posts with label Theme - Owl. Show all posts

Thursday, November 29, 2012

Background Tutorial!


2.5" x 3" Artist Trading Card

Good morning friend.  "Whoo" wants to see another background tutorial???   I want to try and share one a month for a while.  I used this technique on a Artist Trading Card, but you could use it in a altered journal or card as well.  I designed this one using another one of Pink Persimmon's fun ATC Background stamps.  They have 4 different sets.  This one is from "Fairy Tale".  


I also used "Wise Old Owl".  The images in this set are solid and the body parts separate. So you can really get creative and stamp different body parts in different colors.  Here is one that I stamped but haven't had time to use on a card yet.


See what I mean??  He comes with a party hat as well.  Too cute!

Whoo wants to give this technique a try??  Stay tuned for another background tutorial in December!

Hope you find some time to get creative today,
hugs, Melisa


You can check out more Background Tutorials HERE.
You can check out more Mixed Media projects HERE.


****************************************************

Project Details

Stamps : Pink Persimmon  "Wise Old Owl"  and "Fairytale" ATC Sized Background
Check out Pink Persimmon stamps HERE.
Spray Inks : Glimmer Mist "
Ink : VersaMagic "Tea Leaves", Brilliance "Pearlescent Chocolate", VersaMagic "Turquoise Gem"
Glitter Glue : Studio G (Joann's)


Trim watercolor paper 2.5" x 3.5" (I didn't realize it until I went to put mine together that the one above was larger.  That's why the final project has part of the branch cut off).   Spray with aqua and yellow inks.  Stamp Fairytale background image with green ink.  Ink edges with brown ink.

Spray watercolor paper with yellow spray ink.  Stamp owl body and head with brown ink then trim.  Stamp wings in brown ink, trim, and adhere to owl body.  Stamp crown / eyes, trim, and adhere to owl body.  Stamp branch if you like the partial swirlies of the final project.  Stamp branch / claw image across bottom of owl image.  Adhere owl to background.  Add glitter glue to crown.  Type words, print, cut, and doodle around edges.  Adhere to ATC.

Wednesday, April 18, 2012

Hero Arts Challenge


Hello Stampers!  Today I'm sharing a card I designed using a sketch for the Hero Arts April Challenge.  There are 3 sketches to choose from as well as 2 catagories.  The catagories are Sunshine and Showers and Shaped Cards.  Hop on over and check it out.  5 people will receive $50 in product.  The patterned paper is from a new pad I got at Joann's this week.   It's an 8 x 8 paper pad by Colorbok.  There are lots of really cute matching embellishments as well.
Hope your having a great week!
Melisa

You can view all of my Hero Arts projects HERE.


*******************************************************

Project Details
Stamps : Hero Arts
Patterned Paper and Embellishments : Colorbok
Spellbinders : Scalloped Rectangle
Neocolor II Crayons : #20 (Golden Yellow), #59 (brown), #249 (olive), and #171 (turquoise blue)
BrusH20 Pen by EK Success (there are 4 sizes)
Distress tool : Making Memories
Trim green cardstock and blue patterned paper and adhere to card front.  Trim 4 strips of patterned paper, distress edges, and sew on to card front horizontally.  Cut scalloped rectangle using Spellbinders die.  Trim rectangle from watercolor paper slightly smaller than scalloped rectangle.  Stamp tree from Creative Trees set.  Use watercolor crayons to color leaves, grass, and sky.  Stamp owl using Tiny Owl.  Color with watercolor crayons.

******************************************************

Challenges

Sentimental Sunday (sun) - frame it
Paper Sundaes (sun) - anything goes
Craft Your Passion (mon) - die cuts
Papertake Weekly (tues) - stitching
Crafty Catz (fri) - animals
Crazy 4 Challenges (sat) - buttons
Cupcake Inspiration (sun) - photo inspiration

Tuesday, April 17, 2012

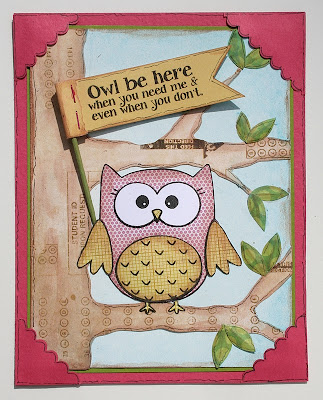
Sweet 'n Sassy "Owl Be There"


Hello Paper Crafters!  I'm back today with another card created using "Owl Be There" by Sweet N Sassy.   Lots of paper piecing on this one, but it really doesn't take long.  I bought some PanPastels a while back and  wanted to try them so I used them to create the sky.  Basically you use a spongy pad, kinda like a make-up pad and rub them on.  They are ok, but not sure I would buy more.   I could brush blue water color paint on for a lot cheaper.  The rest was paper pieced.  I used my brown NeoColor II watercolor crayon around edges, on tree, and around all other pieces. 

thanks for stopping by!
Owl be back next tuesday with my next Sweet n Sassy project!
Melisa

You can view all of my Sweet n' Sassy projects HERE.


***************************************************
  
Project Details
Stamps : Sweet 'n Sassy "Owl Be There"
Colorization : PanPastels, "Turquoise Tint" and "Turquoise"
NeoColor II Brown #59
Patterned Paper : Bo-Bunny 12 x 12 Et Cetera Ledger (tree), My Mind's Eye 6 x 6 paper pad - Blush II (pink polka dot) and Lime Twist (green polka dots), Basic Grey 6 x6 paper pad "Origins" 2009 (yellow).
Scalloped Scissors : Fiskars
Mini Attacher / Stamples : Tim Holtz
tooth pick

*************************************************
Challenges
Love to Create (mon) - friends
What if ? (wed) - birds of a feather
Totally Paper Crafts (fri) - things with wings
Wags N Whiskars (fri) - anything goes

I WON!!!
 I won $10 free digi's from Digi Doodle Shop

Tuesday, April 10, 2012

Sweet 'n Sassy's "Owl Be There"


Good Morning Paper Crafters. Today I'm sharing the other 2 cards I created using "Owl Be There" by Sweet 'n Sassy.   Such a cute little friendship set.  I was inspired to create these when I saw a Color Throwdown challenge posted last week, to use the colors from the Mabel paper pad by My Mind's Eye.  If you are like me you have a pile of those little 6 x 6 paper pads laying around. The small paper pads are perfect for paper piecing stamped images because the patterns are so small. So think of all the options for creating your own little set of cards using this set and your paper pads.  


Soooooo many possibilites with this image!  Wouldn't the image be cute with a little bow on the head for a girl, oh and what about a party hat??? That would make a great birthday card! You could have him sitting on top of a birthday gift. I'm trying to think of other things we could tuck under his wing .... what about a book and a graduates hat on his head .... or a balloon.

Another great idea would be to put two of them standing side by side with their wings touching so they look like they are holding hands. There just may be enough room between the wings to have him holding a banner. We can have a lot of fun with this little guy!

I'd love to know what idea's you have. If you would like to share an idea or a card you created using this little guy just leave me a comment with a link to your card.

Hope you're day is a hoot!
hugs, Melisa

You can view all of my Sweet n' Sassy projects HERE.

*************************************************

Project Details
Stamps : Sweet N' Sassy "Owl Be There"
Patterned Paper : My Mind's Eye 6x6 paper pad "Mabel"
Cardboard Flowers : Jillibean Soup
Buttons : Papertrey Ink
Embossing Folder : Cuttlebug
Border Punch : Fiskars
Spellbinders Classic Oval dies
Mini Stapler : Ranger
Card #1
Create a top from cream cardstock.  Emboss card front with embossing folder.  Trim patterned paper 1" x 4 1/4".  Punch scalloped border.  Adhere together and wrap with twine, threading through buttons as you wrap.  Adhere panel to card front.  Stamp owl and paper piece.  Paint tooth pick.  Stamp sentiment on patterned paper and trim creating a flag.  Wrap end of flag around tooth pick and staple with mini stapler.  Adhere owl and flag to card front.  Doodle around edges.
Card #2
Trim cream cardstock 4 1/4" x 5 1/2", emboss, and adhere to card front.  Trim floral patterned paper panel 2 1/4" x 4 1/2".  Punch scalloped border.  Stamp owl, and paper piece.  Adhere buttons to center of cardboard flowers.  Cut oval with Spellbinders oval die.  Stamp sentiment.  Adhere all pieces to card front.  Doodle around edges.

*************************************************
Challenges
Paper Sundaes (sun) - kraft / diecut (flowers and circle)
4 Crafty Chicks (thur) - flowers
CCEE (thur) - embossing folder
Charisma Cardz (thur) - chipboard
Stamp, Scrap, and Doodle (sat) - things with wings
ABC - anything goes
Stampendous - re-use, re-purpose (tooth pick)
Cupcake Craft (mon) - spring is in the air
Splitcoast Stampers (mon) - scallops

*********************************************

Card #2 was featured at :

Sunday, April 8, 2012

Sweet n' Sassy "Owl Be There"


This is another one of the new releases from Sweet 'n Sassy this month, "Owl Be There"!  Another cutie patootie!   It's so much fun to paper piece this little guy.  This is a card from a 3 card set I am sending to Take Ten for their Variation on a Theme.  I will be sharing the other 2 on tuesday.  See ya then!

You can view all of my Sweet n' Sassy projects HERE.

******************************************************

Project Details
Stamps : Sweet N' Sassy "Owl Be There"
Patterned Paper : My Mind's Eye 6x6 paper pad "Mabel"
Buttons : Papertrey Ink
Embossing Folder : Cuttlebug
Border Punch : Fiskars
Create a top-fold card from cream cardstock. Emboss card front with embossing folder. Trim patterned paper 2 1/4" x 4 1/4". Punch scalloped border from patterned paper and adhere along top of othere panel. Wrap with twine and tie bow. Adhere to card front. Stamp owl and paper piece. Stamp sentiment on cream cardstock, trim creating a flag, and adhere button. Adhere owl and flag to card front. Doodle around edges.

***************************************************

Challenges

My Mum's Craft Shop (wed) - animals
Papercraft Star (wed) - anything goes
Fab N Funky (wed) - embossing
Crafty Catz (fri) - clean and simple
Color Throwdown (wed) - color challenge

Thursday, October 6, 2011

NEW Challenges over at SpeedyTV


Hello Paper Crafters. Today I'm sharing a card that is a gift card holder as well. Hopefully you can see the pocket I created.  I used a credit card as a guide to create the area that is cut in.  This one was created for the very first SpeedyTV challenge!  There will be weekly challenges (monday) and we would love to have you join us.  The theme this week is masculine, and you can check it out HERE.


And if you haven't done so, don't forget to friend me HERE.
I'm drawing 3 names for all my new friends to receive gifts on Oct. 25th!
You can check out my page HERE.

********************************************

Project Details

Stamps : Mark's Finest Papers "Here Comes the Grad"
Patterned Paper : My Mind's Eye "Lush"
Ribbon : Offray
Copic Markers : E23, E35, E37, E99, Y06, B97, B99, N1

Thursday, September 22, 2011

Pink Persimmon Birthday Card using an Owl


Good Morning Paper Crafters.  I have a fun card to share with you today using "Wise Old Owl" by Pink Persimmon.  Isn't he seriously cute!  What's so much fun about this set is that all the parts of his body are separate.  So, you can stamp the body, head, and wings different colors.  I paper peiced the eyes.

One of the reason's that this old owl is so wise is because he wears so many hats!  teehee.  You can add a crown, a party hat, or a graduates cap.  So this set would be great for a birthday card, Father's Day card (with the crown and sentiment "dad you rule" or maybe "king for a day"), or graduation card. 

It also comes with a variety of sentiments :
"What a hoot"
"Whoo loves you?"
"Thank whoo?"
"Guess whoo's a wise old owl?"
and "See you later owl-igator!"

You can check out more inspiring projects by the PP design team over on the PP Blog HERE

I told you it was a cute set!
Have a great day!
Melisa

You can view more of my Masculine / Father's Day cards HERE.
You can view more of my Pink Persimmon projects HERE.
You can view more of my Owl projects HERE.
You can view more of my Birthday projects HERE.

*******************************************************

Project Details

Stamps : "Wise Old Owl" by Pink Persimmon
Patterned Paper : Teresa Collins "Celebrate" line (back side of "Stars" for the verbage paper)
Cut out 3 stars from one side and then use the verbage side for your background
Ink : Distress Ink Broken China, VersaFine Crimson Red
Border Punch : Fiskars
Deckled Scissors : Fiskars

I stamped the body first, then the wings, on white cardstock.  I had to practice a couple of times to get used to how to line the wings up with the body.  Then I added the head, paper peiced the eyes and hat.  You have to stamp the branch on the patterned paper first, then the owl body with branch on white cardstock, then trim the owl body and line it up over the branch you stamped on the patterned paper.
Related Posts Plugin for WordPress, Blogger...