Showing posts with label Manuf - Layers of Color. Show all posts

Tuesday, April 3, 2012

Rejoice / Easter Banner


Last month I shared a valentine banner you could hang across a mantel.  But you can also create table top banners.  This one was created using a chipboard bi-fold album I had in my stash from years ago.  I'm not sure if anyone still makes these, but you could make your own. 


A lot of the supplies I used are old, so I'm not going to include a detailed list this time.  But I will tell you that the beautiful cross is made by Rubber Stampede and it's called Elegant Cross.  I'm pretty sure I bought it at Hobby Lobby last year, so it may still be available.  The butterfly is Layer's of Color. "Rejoice in the miracle of Easter" is a digital image from DeeDee's digi's.


The backgrounds are all patterned paper in pastel colors and then I distressed here an there using the same cream acrylic paint I used on the chipboard letters.


"For God so loved the world ..." is also a digital image.  Most of the time, when I purchase digital images, I make the name of the shop I bought it from part of the file name.  Unfortunately I didn't with this one : ( . 


Hope you are inspired to create your own Easter banner!  I'd love to see it.

And I want to share that I am thrilled to be the guest designer for Sweet N Sassy this month!  Their April new release blog hop is this Thursday and I hope you will join us!  There will also be a party over at SCS on this thread HERE.  You will be able to participate in challenges and possibly win some stamps!!  There are some real cutie patootie's being released this month and I can't wait to share what I have designed with 2 of the new release sets! 


*****************************************
 
Challenges
 
Paper Sundaes (sun) - Easter
Stamptacular Sundays (Sun) - playing with pastels
Papertake Weekly (tues) - anything goes
Southern Girls (thur) - you got something to say??

Monday, March 12, 2012

Have a "Fairy" Nice Day!


Good morning paper crafters!  Today I'm sharing a card I created using one of the Layers of Color stamp sets "Fairy Wishes", designed by the very talented Nina Brackett.  You can find more of NIna's images at "The Craft's Meow" HERE.  This one was really easy to create because the fairy is solid.  I just stamped her on a piece of patterned paper.
Some of you may know, but for those of you who don't, Layers of Color closed up shop in January.  However, all of us Layers of Color fans are patiently waiting to here where stamp/product designer, Laura Kirste Campbell, will be designing next.  It's still top secret, but we do know that Laura will be designing with a "major craft industry company"!!  It's possible that we will be able to get some of the past Layers of Color stamp images from the new company.   As soon as I know, I certainly will be sharing.
The last couple of months I have been checking out a blog called "Paper Issues".  Lots of great idea's for lots of different types of paper crafting.  There is also a monthly challenge.  So if you are looking for great idea's, you may want to consider this one!

Have a great week!
Melisa

Wednesday, February 1, 2012

Altered Heart Shaped Paper Mache Box


Hello paper crafters!  Today I want to share an altered heart shaped paper mache box.  I'm still working on valentine projects and having so much fun.  But I also want to let you know about a HUGE sale over at LAYERS OF COLOR.  Stamps 75-87% off and Spellbinders dies 35% off!!  Serious discounts!!

LAYERS OF COLOR STORE


Isn't that rose image gorgeous!  It's "Cottage Rose" by Layers of Color.  You can get this huge cling mount stamp for 3.49!  Seriously!!  You need to check out the sales before they are all gone.  I think you only have til the end of the week, maybe over the weekend. 
So are you creating projects for Valentine's day??  I'd love to see your Valentine projects, just leave a link in the comments section.
Have a blessed week,
Melisa

You can view all of my Altered Projects HERE.

**************************************************

Challenges
Raise the Bar - circles I used polka dot paper on the side of my box
Stamping with the Dragon - Anything goes
The Shabby Tea Room - love is in the air
Hand Stamped Sentiments - Anything but a card
Tuesday Throwdown - hearts

This project was chosen as a TOP 5 !
***********************************************

Link Parties
Nifty Thrifty Sunday @ Nifty Thrifty Things
Sundae Scoop @ A Time To Create
Sister Sunday Link Party at Sister of the Wild West
The Sunday Showcase @ Under the Table and Dreaming
Make Monday Marvelous @ C.R.A.F.T.
Made by You Mondays @ Skip to my Lou
Inspire Me Monday @ Singing Three Little Birds
Uncommonly Yours @ Uncommon Designs Online
Whatever You Want Wednesday @ Free Pretty Things
WOW Me Wednesday @ Gingersnaps Crafts
A Crafty Soiree @ Katie's Nesting Spot
Watcha Got Weekend @ Lolly Jane Boutique
Show and Tell Friday @ My Romantic Home
Feathered Nest Friday @ French Country Cottage
Strut Your Stuff Saturday @ Six Sister' Stuff
Check Me Out Saturday @ A Vision to Remember


Sunday, January 8, 2012

2 more Valentine Cards


Here are 2 more Valentine Cards I created using "The Love Chapter" art stamp set by Layers of Color!  I guess you have figured out tha I LOVE this set because of all the different projects I created with it.  And isn't that cupid die so cute!


Fun news - I'm working on my first VIDEO TUTORIAL!  I hope to have it ready to share soon!
Thanks for stopping by!
Melisa

You can view all of my VALENTINE projects HERE.


*******************************************************************

Project Details
Card #1
Stamps : Layers of Color " The Love Chapter"
Patterned Paper : Making Memories
Cardstock : Bazzill and Papertrey Ink
Ribbon : Offray

Create A2 card from cream cardstock. Trim patterned paper slightly smaller and adhere to card front. Stamp phrase image multiple times on cream cardstock creating a background. Trim down to 3 x 3.75”, adhere to cream cardstock and trim around edges with deckled scissors. Wrap with red ribbon and adhere to card front. Stamp love block on cream cardstock and trim down. Adhere to red cardstock and trim around edges with deckled scissors. Adhere to card front. Stamp “i love you”
on cream cardstock and trim with deckled scissors. Adhere to card front.

Card #2
Stamps : Layers of Color
Cardstock : Bazzill
Ribbon : Offray
Roses and gems : Recollections
Cupid die : Quickutz
Trim cream cardstock 4.25" x 5.5".  Stamp phrase stamp vertically down left side with red ink. Stamp love block on cream cardstock, trim and adhere to black cardstock.  Trim around edges with deckled scissors and adhere to card front.  Create cupid with Quickutz die and adhere to card front.  Add gems.  Wrap with red ribbon and add red rose.  Adhere panel to black cardstock and trim around edges with deckled scissors.  Adhere to A2 card.

Friday, January 6, 2012

More Valentine Treat Bags


Here is another set of Valentine treat bags.  Designed using "The Love Chapter" art stamp set by Layers of Color.  They were very easy to put together by stamping the image on the front of the glassine bags using black Staz-on ink.  Adhere a bow / paper rose / and ticket. Trim patterned paper to fit inside bag.
Ribbon : Offray
Roses : The Wild Orchid
If you don't know about "The Wild Orchid" then you need to check out all their flowers.  Great deals.

thanks for stopping by!
Melisa

You can view all of my VALENTINE projects HERE.

Thursday, December 29, 2011

Valentine Treat Boxes

I'm ready to start sharing Valentine projects!  I meant to get started in December, but just ran out of time and energy to write the post.  I stacked 4 boxed together and secure with a ribbon.  Isn't that little cupid die too cute!

I hope you are inspired to get started on some Valentine projects of your own.
Have a blessed day!
Melisa

You can view all of my VALENTINE projects HERE.

*******************************************

Project Details

Stamps : Layers of Color “The Love Chapter
Boxes : Creative Cuts and More
Chipboard letters : The Paper Studio
Punch : EK Success
Die : Quickutz
Glitter Glue : Stickles
Ribbon : Offray
Fold and adhere pre-cut, pre-scored boxes. Stamp background images on cardstock, trim and adhere to box front. Paint chipboard lettersand adhere to box front. Punch hearts, add glitter glue and die cut cupid. Adhere to box front. Stack four boxes and tie with ribbon.

Wednesday, December 7, 2011

LOC Dotted Dahlia's Card


Good Morning!  Today I have a simple layout for you.  Designed uisng one of NinaB's new stamp sets, "Dotted Dahlia's" from Layer's of Color.  I love these images.  Clean lines and easy to trim allows you to add dimension by layering and popping up some of the center petals.  I would say the card was quick, but the coloring took a while.  But ....  if you paper pieced it, you could whip it out in a jiffy!  In fact it's so simple, I don't need to write up instructions for this one.  I will tell you that I used Copics :  RV00, RV55, and RV19.

And my beautiful wish to you is that you have a wonderful day!
hugs,
Melisa


Tuesday, December 6, 2011

Christmas card with an Angel using Spellbinders Die


Good morning Paper Crafters!  Today I'm sharing another quick and easy Christmas card, well except for the coloring.  That probably takes longer than anything.  But the time and effort are worth it.

Have a fabulous day!
Melisa
 
You can view more of my Spellbinders projects HERE.
You can view more of my Christmas themed projects HERE.
 
***************************************************

Project Details
Stamps : Layers of Color "Holly Angel" cling rubber art stamp, "Sentimental Banners" clear art stamp set.
Deckled scissors : Fiskars
Embossing Folder : Cuttlebug Holly Ribbons
Glitter Glue : Stickles

Adhere card (4.25" x 5/5") front to back of larger red cardstock panel.  Trim around edges with deckled scissors.  Trim white cardstock 4.25" x 5.5" and 3" x 3 3/4".  Emboss using Big Shot and Holly Flourish embossing folder.  Cut decorative frame using Grand Calibur and Fleur de Lis Rectangle.  Layer these 3 as shown and add glitter glue around edges of smaller panel.  Set aside to dry.  Stamp Holly Angel and banner.  Color and trim.  Embellish angel wings with glitter using a 2-Way fine point glue pen.  Before applying glue, wipe wings with Embossing Magic or dryer sheet.  After sprinkling on glitter, use a tooth pick or paper poker to clean off glitter on any stamp lines.  Adhere angel and banner using pop dots in the middle.  Embellish with glitter glue around banner edges.

Saturday, December 3, 2011

Shabbalicious!


Good Morning!  Today I have some Shabby Chic inspiration for you using some of my favorite things, glitter, lace and doily's.  By the way ...  I have to mention my new doily die ...  it is AMAZING!  And now I can cut doily's any color I want!  I have't had time to use it yet.  It's by Cheery Lynn and you can check it out HERE.    Ordered mine from Frantic Stamper.  Their store is not easy to navigate, but she has sooooo much stuff.  I was having a problem finding somewhere that carried ink pad refills, copic refills, stamp storage sheets all at the same store.  So when I need basics like that it's easier to order from one place and I usually throw in a couple of extra's, like this die as well.  There is no online ordering.  I email mine, but calling is an option as well.  You can give them your payment info over the phone or have them send you the bill via paypal.


Ok, back to the projects.  This is a matching set (obviously).  But the one above is a tag with one of those glassine bags glued to the front.  And there is another little tag that pulls out of it.  I think is perfect for a gift card holder.  I really love the Vintage Postcard using on the card.  Even though it has christmas themed script on it, you can easily use it for other themes as well!


Sorry I didn't have time to share step by step instructions this time.  But here is a supply list and I think it's self explanatory on how I assembled it.

Have a blessed day!
hugs, Melisa

****************************************************

Layers of Color "Sentimental Banners", "Royal Birds",  and "Vintage Roses"  art stamp sets and Vintage Postcard cling art stamp
Spellbinders : "Ribbon Banners"
Ribbon : Hobby Lobby
Glitter : Martha Stewart
Border Punch : Fiskars

Friday, December 2, 2011

Christmas Gift Bag / Box with a Reindeer Image


****  OOPS!  so sorry.  I just realized what the title said when this one went out to everyone.  I just changed it.  Originally this post was set up for a LOC blog hop, but it was cancelled.  Sorry if it was misleading ***

 
Good Morning!  Today I am sharing a gift set designed for Stamper's Sampler Magazine and I'm proud to say, it made the cut!!  In fact I have several projects in the Oct / Nov issue.  I used Creative Cuts and More pre-scored / pre-cut die cuts and Layers of Color Reindeer Waltz.

Gotta vent for just a minute ....  I have to go to my husband's Work Christmas Dinner.  Notice I said "have", teehee.  This is going to be torture for me, seriously.  I don't know anyone, and I'm not exactly a social butterfly.  I'm happy in my studio creating and could go DAYS, without ever leaving the house.  My favorite get togethers are when someone comes over to craft with me ...  and I don't have to leave the house.  Say a prayer for me, I know I'm a grown women, but I have a little social anxiety.
How is the Christmas shopping and putting up the decorations going??  We started putting up the decorations the day after Thanksgiving.  I have 1 tree done.  I have a second tree in the diningroom I have to put up.  I found the CUTEST christmas salad plates really cheap at Walmart.  They have little holly branches and birds on them!  I will try to take photo's soon and share.
Have a great day!
hugs, Melisa

You can view more of my Spellbinders projects HERE.
You can view more of my Christmas themed projects HERE.
You can view all of my Treat Boxes / Bags HERE.
You can view all of my Container / Gift Boxes HERE.
***************************************************
Project Details

Christmas Gift Bag
Stamps : Layers of Color "Reindeer Waltz" (deer)
Creative Cuts and More - Square Bag 01
Spellbinders : Fluer de Lis Doily Accent
Rub-ons : Making Memories (sentiments & flower)
Ribbon : Creative Impressions

Fold pre-scored corners of gift bag and adhere.  Stamp reindeer image on beige cardstock x2.  Trim label with one of the reindeers as shown using Spellbinders die. Hand cut all of second reindeer out except for antlers and adhere over the reindeer as shown. Apply rub-ons and adhere to front of bag. Tie handle with ribbon.

Christmas Gift Box
Stamps : Layers of Color “Reindeer Waltz” (deer)
Rub-ons : Making Memories (sentiment & flower)
Hand cut tag
Ribbon : Creative Impressions
Fold pre-scored corners of gift box and adhere. Hand cut small tag, stamp reindeer and add
rub-ons. Wrap box with ribbon and add tag.

Wednesday, November 30, 2011

Christmas cards with Poinsettia images using Spellbinders Dies


Good Morning!  I'm here today to share a bunch of cards I have made using Layers of Color Poinsettia Frame.  This cling art stamp is compatible with Spellbinders Labels SixteenI also used
Fluer de Lis Accents.  My sentiment is from the  Happy Wishes clear art stamp set.  I noticed that I had 2 cards using this set I had never shared.  I added 3 others from previous post at the bottom.  I also realized I have not been blogging as much as I had planned and I still have more Christmas projects to share.  So I"m going to try and use the next week to blitz you with Christmas and then start posting some Valentine projects.


You can view more of my projects that I have used Spellbinders Dies on HERE.
You can view more of my Christmas themed projects HERE.

Previously posted Poinsettia Frame cards :


Thanks for stopping by!
hugs
Melisa

**********************************************

Project Instructions
Card #1
Stamps : Layers of Color Poinsettia Frame cling art stamp and Happy Wishes art stamp set
Ink : Tsukineko Momento Tuxedo Black
Markers : Copic
Spellbinders Nestibilities Labels Sixteen and Fluer de Lis Doily Accents with the Grand Calibur
Patterned Paper : Basic Grey (red), Bo-Bunny (green), and Prima (off white)
Glitter Glue : Stickles
Buttons : white pearl - Dress It Up, glittered bird : Favorite Findings - Joanns
Ribbon : Offray

Trim off white cardstock 4 ¾ x 5 ¾”. Trim red patterned paper 4 3/8” x 4 ¼” and adhere to green patterned paper. Trim around edges of red patterned paper creating a green border.  Adhere to off white panel. Cut / emboss green patterned paper using Spellbinders Fluer de Lis  Doily border and corner accents. Adhere decorative border across panel as shown. Tie a know  in center of off white ribbon and adhere across card as shown, tucking ends under panel.  Adhere panel to front of card. Cut loop off back of off white button and adhere over knot in  center of ribbon. Stamp Poinsettia Frame on off white patterned paper and color with markers.
Stamp sentiment. Adhere to front of card. Embellish with glitter glue and glittered bird.
Card #2

Stamps : Acanthus Leaves and Touch of Elegance art stamp sets,
Poinsettia Frame cling art stamp by Layers of Color
Ink : Brilliance Pearlescent Chocolate, VersaMark, Momento
Bamboo Leaves by Tsukineko
Cardstock : Bazzill Glitter Glue : Stickles
Spellbinders : Labels Sixteen with the Grand Calibur
Sentiment : Flower Soft
Cut brown cardstock 5 ½” x 5 ½” and adhere to front of card.   Cut Cream cardstock 5 ¼” x 5 ¼” and stamp acanthus leaves in green ink. Ink edges. Stamp squares from Touch of Elegance in   brown ink and then cut diagonally to create corners. Adhere to corners, add pearls, and glitter glue. Wrap brown ribbon around center of panel vertically and adhere to back side.  Adhere panel to front of card. Stamp Acanthus Leaves with VersaMark on cream
cardstock. Then stamp Poinsettia Frame over this. Stamp Poinsettia Frame on old book paper. Cut the frane on the cream cardstock using Spellbinders Labels Sixteen and Grand Calibur and ink edges. Adhere to red cardstock and trim around edges. Color the leaves green and border circles brown. Color Poinsettia flowers on the text paper then cut around the petals. Paper piece these on top of the cream panel. Adhere panel to front of card. Layer sentiment as shown. Add brown bow.

Friday, November 25, 2011

Artist Trading Card / Faith Art

(artist trading card 2.5" x 3.5")

Good morning paper crafters.  I hope you had a wonderful Thanksgiving day and are not too stuffed.  We had a wonderful day and I had fun trying some new recipes this year.  Today I will be relaxing and putting up some christmas decorations.  No black friday shopping for me.  I don't like crowds and univited people in my personal space.  Thus I avoid fairs, concerts, and Walmart for the entire month of december, teehee.

Today I am doing the Faith Art Friday post over on the Layers of Color blog.  I hope that you will check it out every friday.  Here's my post :

"Isn’t it wonderful how we can see and experience God all around us!  The last few months  have been heartbreaking for me because someone who is dear to me, and had been a follower of Christ, shared that he no longer believed there was a God.   This person is very scientific and believes that there is no evidence that there is a God and that He created this wonderful world that we live in.  I was deeply saddened knowing the consequences of our unbelief.  It’s difficult for me to understand how some people can NOT see the evidence, it’s all around us. 
The whole earth is full of His glory!  Isaiah 6:3

I am so thankful that I can see, and for all the beauty that God surrounds us with.  I am so thankful for a loving God who gave so much for me that I might have eternal life.  It’s a free gift to anyone who wants to receive it, to anyone who can see the evidence of God all around them"
If you would like to know more about what I am talking about, just email me at luv_2_stamp@yahoo.com

Hugs, Melisa

***************************************************

Project Details
Stamps : Touch of Elegance, and Dotted Peonies art stamp sets.
Copic Markers : RV10, RV34, RV19, YG61, G21, G24
Spellbinders : Nestibilities Labels Two and the Grand Calibur

The background was created using the circular image from the "Touch of Elegance" art stamp set. It's difficult to see. But I stamped the image with VersaMark ink and then embossed with white embossing powder on 140# cold press water color paper. This works as a resist. Next I rub the orange paint over the entire card, let is set for a minute and then used a damp paper towel to rub some of the paint off, exposing the embossed images. It gives you this cool distressed look. Next I rubbed hot pink paint around the edges to distress it even more. 

Gotta share!!!  I'm so excited ...  I just figured out how to find the code for the font color I want online and then change it in the HTML here!!!  Whoowhoo!  I like to make my links a different color but I want it to match my art.  I have no idea why Blogger doesn't offer more colors for us computer illiterit folks.  My children will be so proud of me.


You can view all of my ATC's HERE
You can view more of my Faith Art HERE.

Monday, November 21, 2011

Free Teacup template!


Good Morning!  Today Layers of Color is having a Tea Party and we hope you will join us!
If you have arrived from Linda's Blog, then you are in the correct place.  If not, you might want to start at the Layers of Color Blog HERE.  It's a circular hop, so you will end up back here.

My project today uses a hand drawn teacup template I designed.  Thank you so much Laura for turning it into a PDF file for me!!  With this template you can create a teacup shaped card, or a teacup shape to put on the front of a card.  So many LOC stamps would have been fun to use on this, but I'm working on my Christmas Cards right now. 

This template is free for you to use, but I ask that you not post the file anywhere else.  Please link to my blog.  If you loose this post, then you can always find my templates on the side-bar near the bottom of my blog.  Not only is the link to the template there, but a link to any projects I have created using the template is there as well.  This template will also be available over at LOC.  Thank you!


Download the Teacup Card Template PDF HERE.  Right click, then click print.

Your next stop in this hop is
NINA! 

Hop on over, or stay for a few more minutes and review my step by step tutorial.
*******************************************************
Project Details
Let me start out by saying you do not have to cut the pattern as shown on the file.  It might be difficult to get both side to match if you do.  The easier way is to print the PDF onto sturdy cardstock and then cut out 1/2 the pattern to use as a template.


I decided I wanted the bottom of my teacup and handle to be red and thought I came up with an easy tutorial to accomplish this without you have to cut the pattern from a seperate piece of red cardstock.  I'll let you be the judge!
Start with a white card. 
Adhere a piece of red cardstock on the inside of the card.  I used Aleene's Tachy glue.  I wanted to make sure it was glued down, so that when I started cutting, the pieces didn't seperate.  Just keep in mind that wet glue can warp your card, so a little goes a long way.  I scribbled it all over the back of the red cardstock and then adhered it inside the card.  Let it dry.


Lay the teacup pattern you created over the back of the card and trace around the edges lightly with a pencil.  Cut around the outside.  Do not cut the inside of the handle. 

back of card
Flip it over.  Sketch a guideline / cut line  along the side and bottom of card.  The photo only show my sketch line on the side, I forgot to include the bottom.  Sorry.    Unfold the card.  Cut off the handle and bottom of the cup from the front of the card along your sketch lines. 

front of card


Now you will be able to see the red handle and bottom of cup from the front of the card.  Flip it back over and continue cutting the inside of the handle.  I started with a x-acto knife to cut the center out, but I can't get smooth cut lines with it, so I finished with a pair of scissors.  Cuticle scissors work great for cutting small curved area's.   I was able to see a little white cardstock around the edges, so I used a red marker to color around the edges.


This photo is of the card opened up, back of card on left.  See how the front of the card doesn't have the bottom of the cup or handle.  Slide the front of the card into an embossing folder.  TIP : Pull the handle above the template if possible.  I didn't and I ended up with a slight line across my handle from the edge of the embossing folder.  You might also try adding another piece of paper across the top of the back of the cup, or you will get that same line across the back of the card. 


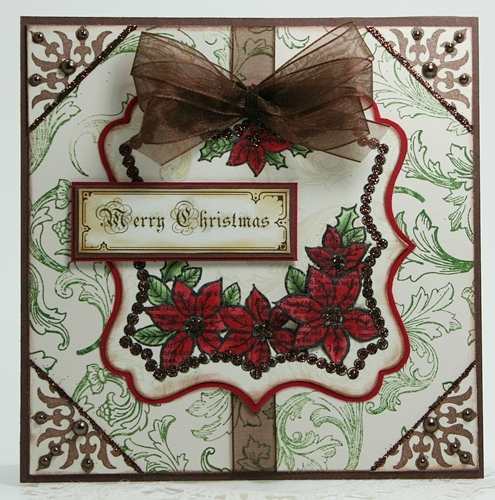
Now embellish your teacup card!  I used one of Nina's labels from her newly released "Elegant Labels" art stamp set (stamped in red).  The labels in this set are compatible with Spellbinders Nestibilities Labels Five, Labels Ten, and Labels Sixteen.  All available over at the LOC Boutique.  Mine is hand cut because I don't have Labels Five. 


The sentiment is from "Sentamental Banners" art stamp set.  Dove and holly images are from the "Glad Tidings" art stamp set.  I cut them out of the wreath image.  And the holly images at the top are from the "Christmas Blessings" art stamp set.


I think you can see how I added lots of glitter (Stampendous Ultra Fine White ) ....  around the cup edges, all over the doves, around banner, and around the edge of the label image.  I use a 2-Way Glue Pen to added glitter.  TIP :  If you get glue and glitter on your image lines, then quickly use a tooth pick or paper piercer to scratch it off the lines. 

I hope you enjoy creating your own teacup card!  I have another one already done and will be sharing very soon.  I don't have the step by step photo's done yet.  It is much easier to create than this one ...  I promise, teehee!

And as always, if you were inspired by this tutorial, I would love to see your creation.  Just leave me a link in the comment section or email me.
big hugs,
Melisa

You can view all of my Tea / Teacup related projects HERE
You can view all of my Shaped Cards HERE.
You can view all of my Christmas project HERE.

Wednesday, November 16, 2011

Layers of Color NEW RELEASE Blog Hop!


Welcome to a very special Layers of Color New Release Blog Hop!
Today is so exciting because we are introducing
Layers of Color Designer Collection
showcasing Nina Brackett's new signature stamp line,
Nina B Designs!  If you have arrived from Linda's blog ...  then you are in the right place.  If not, then you will want to start on the Layers of Color blog to read all the details on how to win prizes!! 
I have been having so much fun designing with these images.  Most of these sets are bigger (6x8") than the usual Layers of Color sets.   My first card uses images from the set "Beautiful Lace".  The tag below was created using images from the "Dotted Dahlia".


Layers of Color is also introducing some fun new embellishments you can use on your projects ...


LOC has also set up an easier way to view projects for specific stamp sets.  You will find lots of inspiration for all of your LOC clear stamps in the clear stamp art galleries!

And have you heard??  Laura and Nina have also designed some new dies with Spellbinders!
Introducing Dress Forms!  Get more info at THIS POST!


and Nested Tea Cups!  Get more info about this set on THIS POST!


Aren't these fun??  You will be seeing more inspiration using these dies in the upcoming months from each of the Layers of Color DT members.  These dies are only available through Crafter’s Home participating stores at this time.  They will be available in other stores, including Layers of Color after CHA.

To celebrate the new release of the Spellbinders dies, Layers of Color is sponsoring another blog hop on Nov 21st.  I hope you will join us for FREE templates and lots of inspiration!


thanks for joining us!
Melisa

Your next stop in the blog hop is the wonderfully talented

  NINA


**************************************************

Project Details
Card - I started by stamping the doily images on white cardstock and embossing.  Then I rubbed on pink distress ink (ranger) with one of the Tim Holtz applicators.  I guess I thought if I did it like this, there would be some variation in the shading, but in the end, it came out all the same shade.  So save yourself some time and just stamp and emboss on pink cardstock, teehee!  I stamped the dress form once on the white cardstock panel and then again on polka dot paper.  Then paper pieced as shown.  I colored the pink area's on the dress with Copics.

Tag / Bookmark -  You know I like it when I have time to get messy!  And it had been a while since I had created a mixed media type background.   So this tag was so much fun for me.  I started with a manilla tag from a local office supply store and covered it with white cardstock.  Then I layered on some old music paper.  My intent was for it to show more, but I messed it up when I kept adding color.   I started with an Aquamarine Glaze by Golden.  You can also use aqua acrylic paint, watered down.  With a glaze the goal is to add color but still be able to see what's underneath (music paper in this case).  Then I sprayed with a blue Glimmer Mist.  Then I thought a tiny spritz of brown would add some dimension, yuck!  Didn't turn out so great.  I should have stopped with blue.  So to lighten it a little I lightly rubbed on some white.  You can see that most near the middle of the tag, coming from behind the flowers.  When I'm trying to add just a little color in a random fashion, I use a fan brush and lightly apply the paint.  Next came yellow.  I put a polka dot stencil over the left upper corner and pounced on some yellow paint, with a really cool tool ... my finger, teehee.  Then I used my finger to add more yellow paint around the edges.   And finally I adhered my Copic colored images and doodled around the edges. 

Related Posts Plugin for WordPress, Blogger...