Saturday, April 17, 2010

Layers of Color - Gothic Crosses


I loved this set the minute I seen it.  I have a Gothic Cross Collection in my home, so I thought it would be nice to create a few home decor pieces to go with that theme.  Now I just have to find a frame.  Guess I should have started with the frame.  For now, there is an easel on the back so I can set it out.
I love collage, and texture!  So this one is just that.  No pumus on this one, modeling paste instead.
Stamps : Layers of Color Gothic Crosses and Touch of Elegance
GinaK (bible verse)
Tutorial : Using Modeling Paste
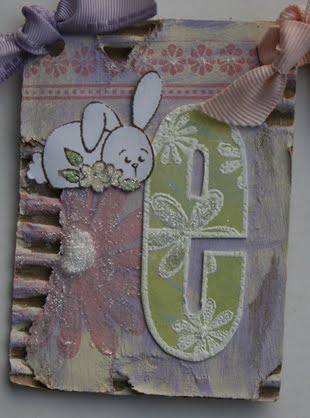
1. I started with corrugated cardboard as my base.  Use gel medium to adhere some music paper.

2. Brush over this with a glaze by Golden - Sea Foam Green and then age it with some brown distress ink - vintage photo.
3. Stamp various Gothic Crosses and emboss.  This set has a 2 step option and you can stamp the center first, mask it, and then stamp the cross.  I used my Eclipse Masking Tape for this, I LOVE that stuff.  Once I stamp and cut a mask, I store it with my stamps for future use.
4. Create texture using modeling paste and a metal embossing template (circles). I rubbed on more modeling paste around the edges and brused it randomly. You can see the texture better on 2b view.  Let that dry. 
5. I'm having a hard time remembering if I rubbed more glaze over the modeling paste (it's white) to make it green or just sprayed with Glimmer Mist - Garden Fairy.  Either way I did spray with Glimmer Mist last.
6. Stamp verse and cut with your favorite Spellbinders die.  I used Labels #5.  I used chalk to get the green background.  Add decorative element at the top using one of the images from "Touch of Elegance".   Add jewel.  Secure to base, and then as an after thought, I sprayed with Work Fixative, since I used chalk on the label.
If you missed my other Corrugated Home Decor pieces then scroll down.  I just posted 3 others earlier in the week.
Thanks for stopping by!

************************************

You can view more of my Faith Art HERE.
You can view more of my Cardboard Art HERE.
You can view more of my Mixed Media / Collage Art HERE.

Thursday, April 15, 2010

FCD Blog Hop!


I designed this one using one of FCD's digital images.  I resized, then printed all the elements on pink DP.  The Circle fit perfectly in my Spellbinders circle die once I cropped it and reduced the size.  I had to play with it a little to get it right, but now I have saved and can use it over and over with it.  I cropped the smaller circles tightly and then reduced their size as well so they would work with my circle punches.  I really like this digital!  You can check it out here with all of FireCracker by Designs digital stamps HERE.

Every weekend FCD offers up a free digital image for you to download!
Check it out HERE.
FCD also has a newly  released "wedding/anniversary" stamp set as well.  You can check it out HERE.

It's time for another FCD Blog Hop.  The DT is doing a fun "Word Play" theme.
You can begin the Blog Hop HERE.
I know the girls will have some clever idea's for you.  And as always Pamela will be offering up something wonderful to give away!  So hop on over and find out what it is!

You can view more of my projects using Digital Images / Stamps HERE.

Wednesday, April 14, 2010

Sweet 'n Sassy Friendship Card


Good Morning.  Time has flown my and it's time for another Creative Belli Challenge!
The Challenge : Die Cuts  I used a Spellbinders Die this one.
The Belli girls are showcasing Sweet 'n Sassy Digital images this week as well.
They are our Sponsor this week, so I know there will be an awesome prize involved, so come play along!

You can view more of my projects using Digital Images / Stamps HERE.
You can view more of my Sweet N Sassy projects HERE.
You can view more of my friendship themed projects HERE.
You can view more of my floral projects HERE.

Wednesday, April 7, 2010

Cardboard Art


I really do love taking pieces of cardboard and turning them into little pieces of art that I can give to someone to sit on their desk, or where ever, to bring a little cheer to their life and remind them how very special they are to me.
I created this one for my daughter Nicole's birthday.  Yep, it's a little bright, but if you knew my daughter, you would now this is right up her alley.  And the sentiment is special between us because when she was little, "our song" was, You are my sunshine, my only sunshine, you make me happy, when skies are gray ....  Ok, enough singing, you get the picture.  The stamp set is called Gardenia's, but I think it worked just fine as a sunflower and to be honest I don't even know what a Gardenia looks like, teehee.  Isn't that the great thing about art  ...  you have creative liberties to make it what you want.  Corrugated cardboard is free and easy to work on.  I always start by tearing away some of the surface paper so that some of the ripples show.

Here are a couple more I created last year.  Since I have way more readers on this blog than I did on my TAC blog, I will gradually work in some of my favorite TAC projects I have created on this blog.


You can view more of my Cardboard Art HERE.
You can view more of my Collage / Mixed Media projects HERE.


 Tip / Technique : Using Pumis Gel
Pumis is a sandy/grainy medium found in the artist section at local craft stores.  The brand I use is Golden and it is "coarse pumis".  It's easy to work with and adds great texture to projects.  It's comes a light shade of grey, but you can mix it easily with acrylic paints.  I used pink on these projects.  You just smear it on using a Palatte knife and let it dry.

You can buy these little cardboard easel pieces to attach to the back of your project. I got mine in the picture frame section of one of the local craft stores, maybe Michaels.
So what do you think??  Hopefully you will be inspired to share a cheerful project with someone special in your life.

As alway, thanks for stopping by, letting me ramble and admiring what I love to do!

Sunday, April 4, 2010

Happy Easter!


Happy Easter to all!  I hope you are enjoying a day surrounded by family and loved ones in celebration of the greatest day ever! 

And I just love this stamp that I found by Verses Rubber Stamp Company.  A perfect sentiment for today.  The cross is by Layers of Colors - Gothic Crosses.

Wednesday, March 31, 2010

Creative Belli Challenge #85 - Color Spray

The Creative Belli Challenge Blog is all about getting you to use some of those embellishments you have been hoarding!  We would love to have you join us every 2 weeks.  This week we were challenged to use color spray.  Our wonderful sponsor is The Stamping Boutique and they provided a few of their digital images for us to play with.  I checked out their store and seen some cute children, fairies, a Princess Jennifer line (sassy), and some great circular sentiments that would work perfectly with spellbinders!  With a variety of styles like this, you will need to click through all the catagories to see it all!


This week's challenge was to use Color Spray.  So here's what I came up with.  I kept mine pretty simple.  I just sprayed some patterned paper with yellow glimmer mist.  You can't really see the shimmer, but it looks pretty cool.  But, I'm sure the Creative Belli DT will be able to show you a variety of  uses for your color spray.  So hop on over to the Creative Belli Challenge Blog and check them out!

Sunday, March 28, 2010

Hear comes Peter Cottentail !

Easter is right around the corner, so I thought I had better get some cards done and in the mail.  


Tip : Stamping on Ribbon
Well not much of an explanation needed.  But my tip is to use a juicy pigment ink.  I used Brilliance Pearlescent Chocolate on the pink ribbon above.  I love the Brilliance line of inks for a pigment ink.  I also use VersaMagic.


Here is an Easter tin I made last year.


Tip : Altering a vegtable can
So inexpensive to make.  It's actually a vegtable can.  Squeeze the sides together slightly to make it longer at the top.  I sprayed it with this yummy brown texture spray paint.  Then smeared on a little pink acrylic paint.  I used my Crop-a-dile to punch holes in the side.  I painted wooden beads and threaded them on some brown craft wire.  I twisted the wire down both sides of the beads and attached through the holes on the sides.   It would be even cuter if you added some wooden balls at the bottom to create feet!
 
Here is an Easter Banner I made last year and posted over on my TAC blog.


Tip : Cardboard Art
The entire project is acrylic paints, stamps, punches and ink.  I used cardboard, tore off parts of the front to reveal the riples. I painted the backgrounds of each panel with layers of acrylic paints. Messy and fun!!
The Easter set I used on the tin and the banner  is No Bunny Like You by TAC.  All the florals are various TAC sets as well.  The font is Big Timber by Technique Tuesday.  This has always been one of my favorite TT sets because it's open.  So you can stamp it on any type of pattered paper and you have a perfect match for a layout.  Or stamp a pattern and then the letter over that. 
I hope this gets you in the mood to create something fun for Easter!

You can view more of my Cardboard Art HERE.

You can view more of my Collage / Mixed Media projects HERE.
Related Posts Plugin for WordPress, Blogger...