Showing posts with label Technique - Masking. Show all posts

Thursday, October 18, 2012

Creating Clean and Simple cards using Eclipse Masking Tape


Hello card makers!  Today I'm sharing some clean and simple cards designed using "Just Bee-Cuz" and "Background Soup" by Red Rubber Designs.  I used my Eclipse masking tape (the rolls at this link are shorter than mine).  It may seem like a lot of work because you have to stamp the main image once on the card front and then again on the masking tape, then cut out your masking image.  But you can use the masking image multiple times.  After the ink for the main image is dry, cover it with the mask image.  Then stamp you background images.   I used torn pieces of masking tape to mask off area's that I didn't want the background image.  I hope that makes sense.  I'm realizing now that it would have been much easier to take step by step photo's.

Thanks for stopping by!
Melisa

****************************************

Challenges

Sentimental Sunday's - Black and white plus one other color
Charisma Cards - clean and simple
Simply Less is More - 1 layer / wings (card #1)
Paper Crafting Journey - add some bling
Do You Stack Up - vintage

****************************************


Project Details 

Stamps Red Rubber Designs 
Ink : Tsukineko VersaMagic Purple Hydrangea
Eclipse Masking Tape
Decorative tape : Heidi Swapp


Wednesday, August 8, 2012

4 Ways to use masking with your stamps


Hello Stampers.  I haven't blogged in several month's and I'm trying to get back into the swing of it.  Today I'm sharing some cards I whipped up using some of my newest stamps.  I love the vintage / collage look of these images.  They are from Red Rubber Designs.  Red Rubber Designs is owned by a very sweet lady I met when I was a The Angel Company Demonstrator.  After I heard that The Angel Company had closed it's doors I was so excited to here that Pam had decided to continue sharing some of there wonderful images but in the retail market now.  You can read more about Pam HERE.  The stamps are sold as rubber sheets, so don't forget to purchase a sheet of cling mount with your order.

You can read more about mounting your rubber stamps using cling mount a hot knife / scissors at the bottom of the post.

I used 2 sets, "Just Bee-Cuz" and "Background Soup".  My favorite section is the "Vintage" sets.  LOVE the collage look and these images make it so easy to whip up a quick collage looking card.  The first card was designed using "masking".  You can read more about "masking" at the bottom of the post.

I used several very basic stamp techniques on the following.


On this one I stamped the image repeatedly to create a background.


On this one I stamped the image twice.  Once on the patterned paper (because I didn't want to try and trim all the little fuzzy details or antennas.  I stamped the image again on cream cardstock, trimmed and then adhered over the image stamped on the patterned paper.


On this one I stamped directly on the patterned paper.

You can view all my Red Rubber Designs projects HERE.

More about masking :
1.  The polka dot stamp image was a little longer than I needed, so I used a post-it note to mask off the left side of the card on this one and the lower part of the card on the 2nd one.  You can just use a regular piece of paper if you don't have a post-it.  The post-it works great because it has just enough adhesive to hold it in place.

2.  On card #1, I cut a window (2.5" x 3") out of a piece of light weight cardstock.   Regular paper works fine, but the light weight cardstock will hold up better and now I can use it repeatedly.  I placed the window over the front of the card.

3.  I stamped the baby carriage once in the center of the window and again on Eclipse Masking tape.  I cut the image from the masking paper and covered the image on the front of the card.

With the window mask still in place, I started stamping from right to left, the alphabet image, and then the polka dots x2.

4.  Masking Fluid -  Brush it over the area you want to mask.  After you are finished with your technique, peel the mask off by gently rubbing with your finger.


More about mounting your stamps :
I love to purchase my stamps as plain red rubber if they are not available already mounted on cling.  That's because store all my stamps in notebooks by either manufacturer or catagory.  So, if my stamps are own blocks, I have to remove the rubber, put them on cling mount and then cut them out with my hot knife / or rubber cutting scissors.  So I love buying just the red rubber, it saves me a step.  The hardest part of converting from wood to cling is sometimes getting them off the block.  If they are resistant, I put them in the microwave for 20-30 seconds to soften the adhesive.  Most of them come off pretty easily after that, but then I sometimes have to rub my thumb back and forth over the back of them to remove some of the adhesive.  You can view a video on how to mount your rubber stamps using "Easy Mount and a Hot Knife"  HERE.  I purchased my hot knife years ago in the woodburning section at Joann's Crafts.  If you have a pair of the Tonic Scissors, then just lay the "full" sheet of rubber over a sheet of cling mount.  Then just cut through the rubber and cling all at once and your scissors stay pretty clean.  If the stamps do not have any rubber space around them or are already trimmed close to the image, then you place it on the cling mount and use a hot knife.  You do not want to use your scissors to trim in this instance because the adhesive is going to stick to the scissors as you cut through the cling mount.  In the video she demonstrates how to use the hot knife with a glass mat.  I have never done it this way.  The knife is really hot and cuts through the cling mount like butter.  I just hold the stamp / cling mount up in the air / off the table and glide the hot knife blade around the edge of the rubber.  I have never had any burning accidents doing it that way, but of course you should do whatever is safest for you.  This is the way I do it most of the time instead of the scissors.  Why?? I'm cheap and I don't want to waste any of the cling mount.  So I cut the images out first, as close to the image as I can, and the place it on the cling mount.  Then trim with the hot knife.

************************************************

Challenges


Woowhoooo!!!  I won $30 free Denami stamps for playing along with the SSIC challenge!!


Card #1
CPS - Sketch
SSIC - baby or pastels
The Crazy Challenge - Black and White plus one other color
The Ribbon Carousel - stitching
Crafty Catz - pink

Card #2
Creative Inspirations - anything goes
Simon Says - BINGO (ribbon, free, blooms(patterned paper)
Fussy and Fancy  - Vintage distressing (torn paper) and lace

Card #3
 CAS-ual Fridays - things you would see in the sky (bee)
Sweet Stampin' - book or book text

Card #4
Tuesday Throwdown - on the move
No Matter Which - anything goes

************************************************


Project Details

You're the best
Stamps : Red Rubber Designs "Just Bee-Cuz" and "Background Soup"
Patterned Paper : Colorbok (yellow), Jennie Bowlin (book paper)
Ink : Tsukineko VersaFine Onyx Black

Mask off left side of card and stamp polka dot strip twice.  Adhere torn book paper.  Adhere patterned paper strip.  Stamp sentiment and car.  Embellish with lace scrap.

Just Bee-cuz #1

Stamps : Red Rubber Designs "Just Bee-Cuz"
Patterned Paper and tag : Colorbok "Antique Paperie"
Ink : Tsukineko VersaFine Onyz Black

Stamp bee repeatedly on top 1/2 of cream card.  Cover lower 1/2 with patterned paper.  Adhere lace across seam.  Adhere paper tag, stamp sentiment and bee on tag.  Stamp bee again on cream cardstock, trim and adhere over bee on tag.  Embellish with ribbon / bow.

Just Bee-cuz #2
Stamps : Red Rubber Designs "Just Bee-Cuz" and "Background Soup"
Patterned Paper : Colorbok (yellow), Jennie Bowlin (book paper)
Ink : Tsukineko VersaFine Onyz Black

Mask off lower part of card and stamp polka dot strip twice.  Adhere torn book paper.  Adhere patterned paper strip.  Stamp bee and sentiment.  Stamp bee on cream cardstock, trim and adhere over bee on patterned paper.  Embellish with lace scrap.


Saturday, March 31, 2012

Artist Trading Card / Faith Art

Artist Trading Card 2.5" x 3.5"

Today I have an Artist Trading Card designed for this weeks Word Art Wednesday challenge.  Cass provides free word art each week for us to use in our projects.  Thanks Cass!!  I had fun getting my fingers messy with this one. 
hugs to you all!
Melisa

*****************************************************

Project Details

Trim watercolor paper to ATC size.  Mine is a longer than 3 1/2 because it's for my revolving ATC holder so I can extend things over the edges.  Stamp heart image (Hampton Arts) with VersaMark ink and heat emboss with clear embossing powder.  Brush on red watercolor paint (VanGough Permanent Red Deep) and blot some area's with paper towel so that it's not a solid color.  Let the first coat dry and then apply another coat.  Draw circles using a stencil (Crafter's Workshop).  Paint random dots black (Lyra Watercolor Crayon).  Paint around heart with black ink, smearing as you to.  Grunge up the heart a little by smearing on a very small amount of black here and there.  Create a mask (Eclipse Masking Tape) and carefully splatter on white watered down acrylic paint by loading a paint brush and flicking it over the ATC.  Ink edges with black ink and doodle.  Wrap with black twine and tie knot.  Adhere to revolving atc holder card.  Print word art, trim, ink edges, doodle and staple with Tim Holtz Tiny Attacher.  Embellish with stick pin (Maya Road) and trim (Hobby Lobby).  Print "true love", trim, ink edges, trim along top with deckled scissors and staple with Tiny Attacher.

**************************************************

Challenges

Word Art Wednesday
Southern Girls - focus on sentiment

You can check out my huge list of daily challenges by clicking on the "Challenges" tab at the top of my blog.  Let me know if I have missed any!


You can view all of my ATC's HERE
You can view more of my Faith Art HERE.

Friday, January 28, 2011

Be still and know that I am God

Hello Papercrafters.  Recently I had the pleasure of creating a project for Faith Art Friday over at the Layers of Color blog.  The verse I selected to focus on is "Be still, and know that I am God" Psalm 46:10.
I wrote this over  a week or so ago, and had no idea how quickly my life would change and how I would need to be reminded of this as well.  We have had some family issues that have been very upsetting this week.   So after a momentary emotional break down, I drew near to God, knowing that it was the only way I could have peace regarding this problem.  Believing that my God loves me and will be with me no matter how difficult life becomes.  I hope that this is a verse that you can fall back on as well when times of trouble come in your life.  If you are in the mist of troubled times as we speak, please email me,  I would love to pray for you.

While this verse was written in reference to a time of war as the Kingdom of David was being established, it is applicable to our everyday lives as well. To “be still” means to cause yourself to let go or become weak. So that He can work. In the face of life problems, how many of us try to “fix it” ourselves, without taking the time to go to God in prayer first. I know that I have. Many of us want to be in control of our lives and work hard at manipulating things to obtain the outcomes we desire. But by doing so, we prevent God from working in our lives, and receiving the honor and glory He desires.
Have you ever wondered how you would respond in the face of tragedy as a Christian? I have. In my life I have not had to deal with the fear, loss, pain and suffering that many have … and I wonder if my response would be one that would bring honor and glory to my God. Events of this past month around the world have broken my heart to hear about, and made me pause and wonder how I would have responded in these circumstances.
Sometimes we need to get out of Gods’ way. Let Him work. How do we do this? By knowing who He is. How do we reach a point in our spiritual growth that we can “be still” in the face of tragedy? By knowing who He is. How do we deal with the grief of loosing a child or loved one? By knowing who He is. How do we obtain peace in a time where others are falling apart? By knowing who He is.
How do we know who He is?? By knowing His history, His word, His promises. This knowledge gives us everything we need to face what life will bring us and an assurance that our God is in control, and if we get out of His way, He will do the work.  Then what will be left for us to do??   … the easy part … singing His praises!
**************************************************************

Project Details
This one is another piece of corrugated cardboard art.  I really LOVE working with this stuff.  The idea for this one was to create a project large enough to have framed and hang on a wall.  This project is 9 1/2" x 12"  and doesn't look so dark in real life.
My bedroom is in green and brown so this will be perfect to frame and hang in there.  Thankfully DH gave me the thumbs up!  He doesn't usually ooh and ahhh over my projects, but he did on this one.


I already had the center panel completed.  This is a result of sitting down one day and spraying Glimmer Mist and adding ink to a pile of panels for future use.  I used Gothic Crosses from Layers of Colors.  I LOVE this set!  I used Eclipse Masking Tape to layer the images.  If you are not familiar with masking then scroll down to the bottom of post for instructions.  The verse is a digital image by Nina Brackett from SquiggleflySpellbinders die - Labels Five
 I began with my corrugated cardboard, tearing away pieces of the top layer to expose the ripples underneath.  I layed the right lower corner and left upper corner torn patterned paper and center panel over it to help me decide where to tear and balance it.  I never know which direction I will go and just continue to add and layer things until I get a look I like.  Don't be afraid to just start slapping it on.  It's just a peice of cardboard, and it is so easy to start all over again if you don't like it.  Usually there is some type of patterned paper barely peeking through, because my original intention is to have it on the project, but by the time I'm done, it has been mostly covered.  Take a look at the left upper corner and you can see some music notes peeking through.

After tearing away some of the top layer, I add acrylic pain
t.  Usually 2-3 colors.  I already had the brown to accentuate the inside of the ripples, so I mostly added white and a tan colors along the top, as well as some green Glimmer Mist here and there.  Next I added white crackle paste with a palette knife. Not as much as usual, but you can see it allong the edges.  Remember the thicker the crackle paste, the larger the cracks.  I found a new crackle paste because those little bottles by Ranger can get pricey, and I wanted something more readily available since I love using it.  Mine is by DecoArt and can be found at Micheals.  It comes is a 10oz container versus the little 1oz by Ranger. 


I wanted to add more texture and I had picked up some doilies at a local antique store recently.  I LOVE lace, so what better way to enjoy it than to include it on a wall project!   The rest is pretty easy to create looking at the photo's.


I hope this little tutorial inspires you to create some of your own backgrounds.  If you do, shoot me an email.  I would love to check it out.
I hope you have a crafty day!
Melisa


See to other Masking Tutorials I have done HERE.

You can view more of my Cardboard Art HERE.
You can view my other Faith Art projects HERE.
You can view more of my Collage / Mixed Media projects HERE.


*************************************************

Masking Tutorial

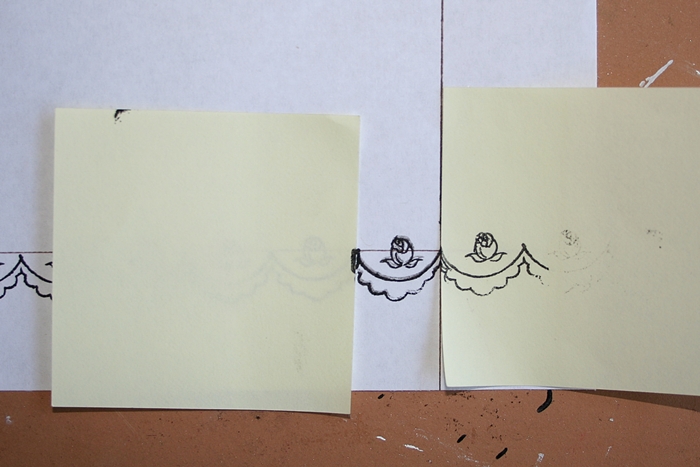
If you are new to stamping, you may not know what masking is.  It is simple the covering up of an area the you want to stamp over, but only want the image to appear around the masked image.  So in this case I stamped the center portion of the cross first onto my project.  Then stamping it again onto another piece of paper.  Cut the second one out creating a mask to cover up the image on your project.  I use Eclipse Masking tape because it is lightly sticky (like a post it note) on the back.  Sometimes Post-it notes will work.  But only a small portion is sticky.  Post-it notes are pretty expensive, to I looked at the Eclipse tape as an investment long term.  It has lasted me a long time and I love that it stays put while I"m stamping over it with the second image.


Lay your mask over the same image on your project.  Now stamp the background image over it.


And that's how you get that great layered look!

This is just one technique for masking.  It is used with brayering as well.  And I'm sure other ways I am not even aware of.  I have tried masking fluid and didn't like it.

************************************************


Sunday, January 10, 2010

Crafty Secrets Cherish Stamp Set


12x12 Layout
I designed this vintage style layout using the "Flourishes" and "Cherish" stamp sets from Crafty Secrets.  I love their stamps and I can't wait til the new release that is coming very soon!!


Frame and Masking Tutorial
This is a close-up of the frame I built using masking tape.  If you take a look at the stamp sets, you can see that I used a couple from Cherish, but most of the frame was built using one stamp from the Flourish set and stamping it over and over, masking where needed.  I started with a penciled frame (rectangle) as guidelines on off-white cardstock.  I used the photo size to determine the size of the inside window.  I started stamping in the lower left corner and then continued up the left side, across the top, down the right side, and across the bottom.  I stamped the first image on the left lower corner of the frame and again on Eclipse Masking tape.  I trimmed the image from the Masking tape and then layed it over the same image I had just stamped on the project, masking - or protecting it.  Then I stamped the second image up the left side - "love" and again on Eclipse Masking tape.  Trimmed it and layed it over the same image on the project.  At this point I started using the one flourish image to finish the frame.  Again stamped the image on the project and again on Eclipse Masking Tape.  Trimmed it and layed it over the one on the project.  Seeing a pattern?  Here's the good news ... I can use the same flourish mask the rest of the way around the frame!  I know it's a little extra work creating the mask, but it will be worth it once you finish!  Giving you a one of a kind layout.

Now that it is all stamped, I trimmed out the inside of the frame using an exacto knife and a metal ruler.  I cut the "straight" area's first, stopping when a straight line intersected with a curved area of the image. Then I went back and trimmed around the part of the image that exteded over the pencil line.  That's how I got the unique shape on the inside and outside border.  I used a stipple brush to add red ink and distress.  I also traced around some of the swirls and inside the florals with red prismacolor pencil and blended with OMS to add some color.


2 more close-ups


I used Glimmer Chips on corners and here.  I think the patterned paper is Creative Imaginations as well.


Card
For this card I stamped the image on a Creative Imaginations Patterned Paper Frame.  I used Copics to color with.  I think the Creative Imaginations frame works great to create a romantic mood.


Thanks so much for checking out my blog!  I hope you are inspired to create this week!

Monday, October 26, 2009

Crafty Secrets Baby Girl Card and Layout

Hi ladies.  Today I'm posting a  Layout I created using one of my Crafty Secrets Stamp Sets - Baby Girl Clear Art Stamp Set.  Check out the actually stamp set at the bottom of the post, so you can see how I used it.


Frame and Masking Tutorial
I began with my photo and matted it.  Next I had to determine the width of the frame around the photo.  The sides had to match the width of a series of the scallops if I wanted to finish the corners nicely.  If you take a look at the photo of the stamps for this set, you will see that the scalloped image as 6 scallops.  I stamped the image twice on a piece of scrap paper, end to end to help figure the measurements of the frame. 


I liked 7 scallops across by 10 scallops vertically.  So I measured across from edge to edge for 7 scallops, that equaled just short of 4", and again from edge to edge for 10 scallops - 5 5/8".  So now I had my measurement for my guidelines of the frame.  I cut a piece of white cardstock 6" x 7.5"  and penciled in my guidelines, creating a 4 x 5 5/8" rectangle (I used a pen on mine so it would show up for the photo).  You want the pencil lines light enough so that you can go back later and erase it.  When I am drawing squares or rectangles I use a tool called a t-square.  It is a drafting tool that allows you to have perfectly aligned edges.  And you can read more about how to use it HERE


So now I'm ready to stamp the scalloped border. 
In order to stamp the image along the penciled line, you need to mount your stamp on an acrylic block with lines on it.


You will line the white line on the block with the penciled line on the paper.  You might want to practice a couple of times before stamping on your project.  Practice by drawing a pencil line on a scrap piece of paper and see if you can stamp your image along that line.  Standing up over the stamp/block, helps you to be able to line it up.  Once you are confident you have that skill down, you are ready to stamp around your guidelines. Start in the left lower corner and stamp the first 6 scallops. 


In order to stamp just one more scallop, you have to mask off the 2 ends as shown below.  I know mines a little messy, but I was in a hurry to finish these tutorial photo's.


Take the post-it note mask off and stamp up the right side 6 more scallops.


Mask off 2 ends so that you can stamp 4 scallops to equal 10 up the right side.


Remove the mask and stamp 6 scallops along the top.


You will continue masking and stamping around the frame until you finish down the left side.

Here are some more details.  I love using stamped images to create my own little embellishments!


Patterned Paper : Crafty Secrets, Daisy D, Flower Bazzill
Ribbon Hobby Lobby, Spellbinders scalloped dies, Deckeled sissors

Related Posts Plugin for WordPress, Blogger...