Showing posts with label Theme - Summer / Beach. Show all posts

Monday, June 24, 2013

Scrapbook Layout using GinaK Designs "Gift's of the Sea"


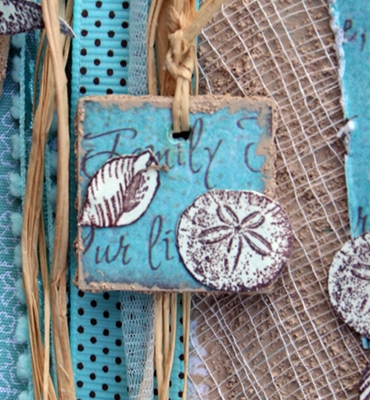
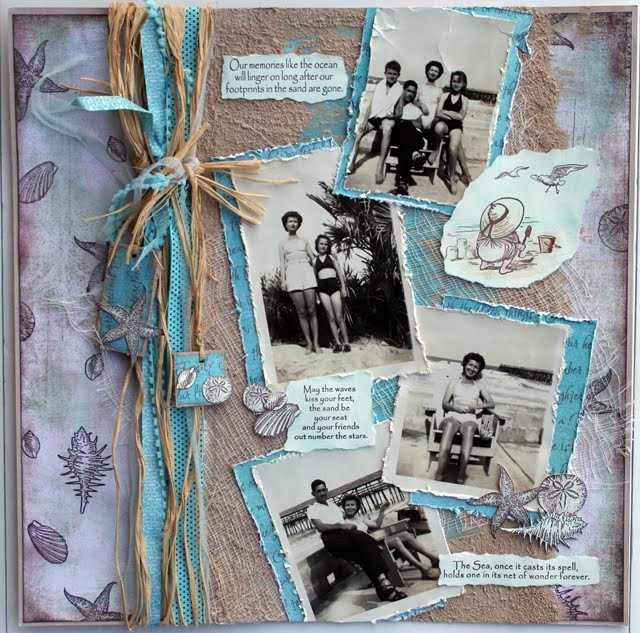
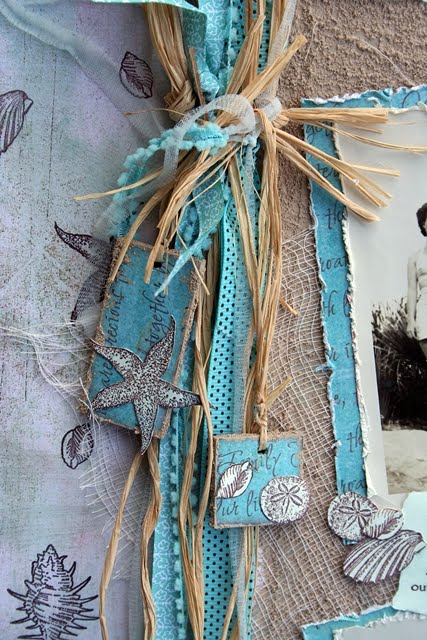
My layout today was designed using stamps by Gina K. Designs.  I used up some really old products from my stash (patterned paper, cardstock sticker embellishments)!  The hemp / sea shell trim was a really cool find from years ago at a local craft store.


I created the sand using Pumice (Golden).  You can find it in the art supply section of a local craft store.  It is grey in the container but mixes with acrylic paint.


 I mixed it with a cream color and then rubbed some off white paint over it to add some highlights.  


You can check out all of my Gina K. Designs Projects HERE.
  
Hope you are staying cool this summer!
Melisa


********************************************************

Project Details

Stamps : GinaK Designs "Gift's from the Sea" and "Lovely Labels 2"
Die : Tim Holtz (flourish)
Deckled Scissors : Fiskars
Distress tool : Making Memories

*******************************************************

Challenges

Scrap It Girl - Use your dies (swirlies and label with "Faith is Knowing" sentiment)
Scrap the Girls - Winter colors (blue and brown)

Friday, July 29, 2011

Beach Mini Album


I had so much fun making this Beach Mini Album!  My basic supplies were paper, ink, and stamps!

I decided to use the Creative Cuts and More 6" x 6" album.   You can order an album kit, or the cover and pages individually.  You have the option of regular pages or pages with tab.  So many options.  I started with chipboard pages and and covered them with cardstock.
The albums come in other sizes and you can check out all of Creative Cuts and More album options HERE.  Don't forget to check out the kits as well.


I stamped the light blue cardstock with various swirls and seashells with "bashful blue" by SU.  I inked the edges of the label, light and medium blue cardstocks with Tsukineko Brilliance Pearlescent Chocolate and  Pearlescent Beige.
Most of the images are from GinaK's "Gifts From the Sea".  I included a few images from Layers of Color "Under the Sea" and Crafty Secrets "Seaside" as well. 


You can achieve that beachy feel ...
by adding twine / raffia / jute and by distressing the edges with ink and a Tim Holtz distress tool.  Don't be afraid to add a little ink or paint around the edges of your photo as well.  Scroll all the way down to check out a few more idea's on how to achieve that beachy look, including sand.


The die used for the labels was Spellbinders Labels Eight with my Grand Calibur.


There is a lot of fussy cutting, but worth it!


Your next blog to visit is ...
the entire blog hop list is ...

Need a few more beachy idea's ??

If you want to add "sand" to your layouts ... use pumus.
And cheese cloth is another great product to use on your beachy layouts.


 I created this layout using the "Seaside" set by Crafty Secrets.

I created my own chipboard charms.


You can see the pumus - sand in this close-up.  You can get pumus in the artist section of your local craft store.  It comes in a grey color, but you can easily mix paint with it.


And you can see the cheese cloth in this close-up.

I hope you are inspired to scrapbook those summer photo's!
hugs, Melisa

******************************************************

You can view more of my Mini-Albums HERE.
You can view more of my Beach / Summer projects HERE.
You can view more of my Creative Cuts and More Projects HERE.

Monday, July 25, 2011

Mini Album #5 : Beach Album


Good Morning Paper Crafters.  Today I am sharing a summer album I created a few years back and never shared on this blog.  It was designed using a mini album by The Angel Company.
It's called Pemberly Bay.  It's a matchbook album and REALLY easy to put together. 


This photo is of my daughter.


and a few friends.

The stamp sets I used for the seahorse / seashells / phrases is an old TAC set, but a couple of other stamp sets that work well instead would be GinaK's "Gifts From the Sea" and Layers of Color's "Under The Sea".


And in this photo from left to right : a friend, my daughter and my son.

More friends on these 2 pages.


If you like mini-albums then please join me on Friday for a summer mini album blog hop sponsored by Creative Cuts and More.  I'm sure you will find lots of inspiration for your summer albums!

And if you need a consultant from The Angel Company so you can order your own Pemberly Bay mini album kit ($6.95), then please email me at luv_2_stamp@yahoo.com.  I just happen to know a few of them that you could order online from.

Thanks for stopping by!
Melisa

*******************************************************

You can view more of my Mini-Albums HERE.
You can view more of my Beach / Summer projects HERE.

Friday, June 3, 2011

Don't go breakin' my heart ....


Wanna know how to break my little artsy heart???  Issue a "cardboard" challenge for the summer issue, and then don't publish my little Under The Sea art piece.  :  (     I don't usually whine or complain on my blog, I save that for DH, ha!  But Stampers Sampler has broken my heart.  It's a day like this that makes you want to throw in the towel and stop submitting.  What I am more upset about is that I sent them $10 to mail this and 3 other cards back and they haven't!  I worked hard on this, and I hope it didn't end up in a trash can somewhere.

But I want give up!  I love their challenges and template challenges and they really spark my creativity so I will push on!  And I have to say that the June / July issue is OUTSTANDING!  Even if you don't want to buy it.  Stop by a nearby Michaels or Barnes and Noble and check it out.  The hot air balloon template projects are AMAZING!  What creativity!   And of course I love all the cardboard art.  I saw 1 name I recognized.  This chick is an outstanding mixed media artist.  I wanna be just like her when I grow up!

If this issue inspires you to create something using cardboard then I would love to have you add it to my Flickr group HERE.
Need more inspiration ??? 
You can check out more of my cardboard art HERE.

****************************************
Project Details

Ink - VersaFine Onyx Black, Brilliance Pearlescent Chocolate both by Tsukineko.
Corrugated Cardboard.
Pumus - Golden.
Crackle Paint - Ranger
Acrylic Paint - Making Memories.
Tuelle - Bazzill.
Raffia, hemp and shell fiber - local craft store
Clear pebble embellishment - Making Memories

Cut corrugated cardboard to size and tear away some area’s to expose the ripples.
I started out applying some vintage music paper but it was eventually layered over
and now you can only see hints of it (The Etude at the top).  Apply acrylic paint (mine
is watered down so that it is a little transparent). Apply pumus (it’s this wonderful sand
like product you can find I the artist section of local craft store) with a palette knife.
Pumus is grey in color, but you can mix it with paint. I used a beige color. After dry,
apply crackle paint. Add brown ink. Stamp images and trim. Stamp sentiment and
trim with Spellbinders die, then ink edges. Cover back of project with white paper.
Wrap with fibers and adhere clear pebble to center of knot. Adhere sentiment
and images. Add a cardboard frame stand to the back so you can display it
on a table top.

Have a blessed weekend!!
Melisa

Sunday, May 29, 2011

Published in Take Ten Summer Issue


Today I'm sharing a card published in the Summer issue of Take Ten.  I designed this one for the "spray ink" challenge of this issue.  Lots of cheerful summery cards in this issue.  And I loved the Guest Artist this month, Miriam Napier.  She created some beautiful cards.
I hope you all are starting your summer off with some fun outdoor activities.  DH and I have been laying out in the sun.  We are trying to work our way up to going to the community pool.  It has really heated up here in Texas, we are hitting 100 already. 

Gotta share that today I was rolling up a piece of carpet I decided I didn't want to use in the diningroom and to my surprise found a dead baby snake!!  That's 2 snakes those cats have brought in the house so far!  The first one was alive, but a baby.  So I scooped him up and tossed him out the front door.  But luckily no birds yet!

We are still shopping for livingroom furnature.  You would think this would be an easy process.  We have spent 2 seperate days the last month going from store to store.  I can not wait to get this settled because I can't really make any other decisions, like curtains, until I get the furnature.  The biggest issue is pets!  We don't want a fabric couch since we have pets.  So we are searching for a comfortable leather couch and matching recliner.

Today I unpacked all my sea shells.  Many of the sand dollars and other shells were collected by my children and I when they were younger.  I created a sea shell wreath with shells we had collected together.  I'm using them in our bathroom.  We are slowly making progress.  Part of the problem is that I hate shopping.  I'd rather be home creating.  But we have got to get some of these rooms finished and decorated.  I might want to have some of you over someday!

I am very excited.  My daughter is comig for a visit in 1 week.  There will lots of crafting with her.  We are going to do the Christy Tomlison "She Art" class together.  I had already taken it, but I'm going to watch all the video's again with her and try to get some canvas's done.  It should be fun and messy with 2 of us in the studio!

I hope you are having  a wonderful holiday weekend!
******************************************

Project Details

Stamps : Layers of Color Butterfly Collector and
Happy Wishes art stamp sets.
Ink : Brilliance Pearlescent Rust and
VersaFine Onyx Black by Tsukineko
Glimmer Mist Spray - Robin’s Egg Blue by Tattered Angels
 
Spray card front with Glimmer Mist spray ink. Stamp sentiment and butterflies.

Wednesday, January 12, 2011

Layers of Color New Release Sneak Peek #1!

This is a SUPER exciting new release because…
Nina Brackett has designed new clear stamp sets for Layers of Color!
…and LOC is revealing their new cling art stamp sets as well! Then top that off with another fabulous Layers of Color Designer Blog Hop (with a Valentine’s Day “Love” theme!), where you can have many chances to WIN new release art stamps from ALL the blogs on the hop!!…You’ll want to join us for the amazing inspiration our talented design team will be sharing AND to enter the Grand Prize drawing where you could…
WIN THE ENTIRE NEW RELEASE!! See you back here…JAN. 17, 2011!

So here is my first sneak peak for you


For more sneak peaks, check out the following DT blogs:

Want to show everyone you are a Layers of Color fan??  Grab a blog button HERE.

*****************************************************
Project Details :
Stamps : Layers of Color Under the Sea and Sent with Love clear art stamp set
Ink : Tsukineko Momento Rich Coccoa, Brilliance Pearlescent Brown
Cardstock : Bazzill  
Old book paper
Paper emphemera : Jennie Bowlin
Spellbinders : Labels 14,  Lotus Pendant
Cuttlebug : Swiss Dots
Ribbon : Seam Binding May Arts, twine unknown
Button : Dress It Up from local craft store

More Sneak Peaks coming!!!!

Saturday, September 25, 2010

Stencil Tutorial #2

Good Morning!  Today I want to share another stencil tutorial with you.  Did you know that Layers of Colors sells Art Stencils??  Gorgeous patterns!  You can check all of them out HERE.

Last week I shared a project using one of the stencils and modeling paste.  If you missed it, you can check it out HERE.

This week I want to share a card using a stencil and color sprays.  Another messy project, but worth the effort.  This background turned out so cool.


Supplies
White watercolor paper, Black VersaFine Ink (Tsukineko), Clear Embossing Powder (Stampendous), Memento Tuxedo Black, Glimmer Mist - Glimmer Mist Fully Purple, Lily Pad, Twighlight, Ink - Brilliance Pearlescent Crimson around the edges, Copic Markers, Stencil (background) - Layers of Color, Stamp set - "Under the Sea" and "Old World Flourish" - Layers of Color.


Technique : Stencil with Color Sprays

Use a circle cutter and cut watercolor paper / card.  Spray watercolor panel with twilight Glimmer Mist.  After dry lay stencil over watercolor paper ( I used stencil adhesive with mine).  Spray with Lily Pad and Fully Purple Glimmer Mists.
I just love how this background turned out.  And with all the choices for color sprays, the results are endless.  I am totally loving these stencils!!

After drying ... ink edges with Brilliance Pearlescent Crimson.  Stamp flourishes, sea grass, and coral with pigment and emboss with clear embossing powder on watercolor paper.  Adhere to front of card. Stamp shells, fish, and sea horse on white cardstock with Momento Ink and color using Copic markers. Cut these images out and adhere to front of card.

Glimmer Mist tip:  Do not shake up and down to mix.  Shake from side to side to help keep it from clogging up.

I hope you will try a stencil out on one of your projects!  If you do, leave me a link.  I would LOVE to see what you come up with!

More stencil techniques coming in the future.

I'm linking this one to the following awesome challenge blogs!
A Spoon Full of Sugar - "Anything Goes"
Creative Inspirations - 2 or more shaped images

Have a blessed weekend!

Wednesday, August 25, 2010

Inchies and Twinchies

Hello Papercrafters.  I spent the day yesterday working on inchies and twinchies.  Not familiar with the term??  They are little mini works of art either 1" or 2" square.  There are lots of paper crafters out there that swap them.  Some collect them as is, but they can be used on other paper projects as well.  There are even 2 challenge blogs that focus on these little pieces of art.  Inchy by Inch and Small World of Inches and Twinches.  I have designed 3 cards with inchy layouts, and 3 twinchies.  I also have a tower of inchies that I made last year and adhered to wooden blocks.


This was so easy to put together.  I used a leaf stamp from the "Vintage Roses" set by Layers of Color and one of the sqaure window cards by Creative Cuts and More.  CCM makes wonderful pre-cut window cards for inchies and twinches.  This one is the A2 Square Borders Window Card.  I adhered my 3 inchies inside the card. Isn't it cute how they peek through the window.
Other inchie window cards are :
Check out this page for even more Square Window Cards for inchies and twinchies HERE.

I'm linking this one to :


I used 6 inchies on this one.  See how versatile these little cuties are.  For this one, I used 4 of the inchies with one stamp.  I adhered them on the brown cardstock and then stamped the clam shell onto them.  If you have an even larger stamp you might consider using 6 inchies.  Stamps are "Under The Sea" by Layers of Color

I'm linking this one to :
The Shabby Tea Room (metal starfish charm)
and Stampin' Sisters for Christ ( A special moment spent with Jesus - when walking on the beach in Jacksonville, it was so peaceful and quite and I would just walk and pray)


This one includes a twinchie and 2 inchies.  Stamps are from "Under The Sea" by Layers of Color.  Are starting to see all the fun options with these and how easy they are to put together??

I'm linking this one to :
Stamptacular Sunday Challenge (more than one stamp)
Papercutz Challenge (anything goes)


This is a twinchie set I created.  I didn't have time to make cards with them.  I used "Butterfly Collector" by Layers of Color.


Here is a close-up of one of them.  I bought some 2"wooden blocks and I was thinking about putting them on those.

I"m linking this one to:
Allsorts (Minature, less than 3")


Here is an Inchie tower I created using 1" wooden blocks.  I created these last year.  I wanted a set with red and black to match my craft room. 

Did you know there are stamp companies that sell inchie images?  Lockhart and Inkadinkado.  But you can create an inchie from a larger image by trimming it down.  When I'm trying to decide if part of an image will work as an inchie, I use this little window template:


I lay it over the image to see what part might work.  For instance the 2 ladies are from much larger images by FCD.  The set is called "Leading Ladies".  Isn't the ballerina cute??  She is a cupcake topper image from "Vintage Cupcake" set by Pink Persimmon.  The apples are from one of my fall GinaK sets.  I bet if you started going through all you stamps you would find parts of larger images you could use as well.  The backgrounds behind the 2 ladies are from Inkadinkado.  They sell themed inchie clear stamp sets and you can find them at local craft stores.

Check out Lockharts "Itty Bitty" collection HERE.

So are you ready to make some inchies and twinchies??
You should set up a swap with your stampin' buddies.  Set up the guidelines that require them to create them with card making in mind if that is a concern.  You could ask them to create 3 inchies with the same theme to use on a card.  What fun it would be to see the different interpretations!

I hope you learned something new and are inspired to create something this week.  If you decide to do some inchies or twinchies, let me know.  I would love to see how you were inspired.

***  It's not to late to sign up for my August Blog Candy.  Go  HERE to read about all the details to qualify to win a Crafty Secrets stamps set!  ***
Woowhoo, the weeked is almost here!  Do you have any fun plans??

Wednesday, August 18, 2010

Sun, Surf and Sand

Good Morning!  I have lots to share today and would like to begin by letting you know that I will begin co-hosting the Scrapbook Inspirations Challenges over at SCS starting on Monday!  Did you know that SCS had Scrapbook challenges??  They have several.   

You can check out my challenge thread at HERE.  And you can check out all the Scrapbook Challenges HERE.


Today is Creative Belli Challenge day.
The goal of the Creative Belli challenges is to encourage you to use up those old, forgotton supplies.  Not hard to find in my scraproom because I've been hoarding for years.  We would love to have you join us and play along HERE!

This weeks challenge is "circles" and "metal".  There is a sketch as well, but it is optional.  Well the circles are kinda obvious.  I used a metal tag clip and metal brads.  The background paper is by My Minds's Eye So Sophie collection.  The scalloped circle is Bazzill.  It just didn't look right as a solid color, so I grabbed my swirly stamps and created my own dp background.  That's the wonderful thing about stamps!  So many options.

So I decided to do a layout.  And chose to use my Layers of Color "Under the Sea" stamp set.  These images are so cute and worked just perfectly for this layout.  These photo's are from 2000.  My daughter was 10 (photo to far left) and my son was 12.  The 2 extra's are my neices.  We have never lived close enough for us to be able to spend time with them.  So I used to have them for a week every summer.  And go to the beach was always a part of our fun summer activities.


We would love to have you join us.  Hop over to the Creative Belli blog and check out what the other designers have created to inspire!

I hope all of you have a wonderful day filled with blessings!
Melisa

Friday, July 23, 2010

Beach themed Circle shaped Card

I found this digital company recently and fell in love with their images.  Even if your not a digi fan, I think these images will tempt you to give a try.  So when your done here, take a minute to check out Isabella's Sketchbook.  I double dog dare you!  And if you decide to give them a try, let me know if I helped to convert you!

OH, and guess what??  I played along with their challenge blog last week and won!!  Wooowhooo!!  Check out the Challenge Blog HERE

 
I just love that these 2 friends seem so joyful just being together.  So I used the sentiment "Life's a beach with a friend like you".
I used Beach Fun, Shell 1, Shell 2, Shell 3.  Oh no!!  And I just realized while linking this up that there is a Shell 4.  How did I miss that one!?!?  The shells are much bigger in the original file.  That's the fun thing about digital images, you can resize them to fit your design!

DP : Memory Box 6x6 Paper Pad - Spearmint
I love the soft colors of this pad
Ink : Versa Magic Oasis Green (around the edges of both circles)
Coluzzel extra lg circle template
Spellbinders die
ribbon - unknown
Chalk : Pebbles Inc
I used an aqua on the outer area and then transitioned into a light green.  You can barely see it in the photo, but in real life it adds so much.  I use these alot.
The "Shimmer" Chalks are the best because they go on and blend the best to me.
Thanks for stopping by and have a fabulous weekend!

You can view more of my projects using Digital Images / Stamps HERE.
You can view my Shaped Cards HERE.
You can view more of my Summer / Beach themed projest HERE.

Wednesday, July 21, 2010

We've Moved Card using a digital stamp

Well most of you already know that.  But when I found this cute digital image by Isabella's Sketchbook, I knew I had to use it to make an official announcement.

It's also Creative Belli Challenge Week.  The challenge this week is to use the Sketch provided and include some movement!  I totally forgot about the sketch part, so make sure you jump over there and take a look!!
Creative Belli Blog

The Belli Girls have created some really cool cards that MOVE!! Literally!!


So just in case you want to send me a Christmas card this year, or just a quick hello, my new address is:
20014 Cypresswood Glen
Spring, TX 77373

I can't wait to check my mailbox!!

And here is a summery card I created using a Lizzie
Anne Designs stamp set.


Thanks so much for stopping by!!

You can view more of my Digital Image / Stamp projects HERE.
You can view more project that I used Spellbinders Dies on HERE.

Wednesday, June 2, 2010

Summertime, summertime!

Good Morning.  Well I don't know about where you are, but here in Florida things are heating up.  And summertime is definitely here.  So what better way to kick off June than with a summer project!  I used Crafty Secrets Seaside stamp set for this project.


This is a layout I created using the Seaside stamp set, last fall.  But I decided to wait for a warmer day to post it.  I had ALOT of fun with this one.  I started with distressed background paper by Basic Grey.  As you can see I stamped the shells to create my on designer paper.  I added a strip of blue down the center of the layout.  I found the perfect sheet of blue dp in one of my Crafty Secrets Paper pads to mount my photo's on.  Then I started adding elements that work well for a beach page.  If you know me, you know I love texture.  On the detailed photo's below you can see how I layered Course Pumis Gel (gritty medium found in artist section at local craft store) and cheese cloth.  Add of course I had to throw some raffia on there. 


I created my own chipboard charms to dangle.


And I embellished the rest of the layout with some of the wonderful images from the Seaside set.


Doesn't it make you want to head out to the beach??

Thanks so much for stopping by!

Monday, February 1, 2010

Just My Sketches Challenge

Good Morning!  I'm excited to share with you a unique and fun challenge blog today.  Deanne over at Just My Sketches has decided to add a little twist to her sketch challenges that I think you will find is wonderfully creative and different from the other challenges blogs.  She has decided to combine her sketches with MUSIC!!  I thought this was the coolest idea because I LOVE music and listen to it when I'm creating (when I'm not listening to political talk radio).  I'm convinced it makes me more creative.
I have always admired an artist expression through lyrics and have found many songs express perfectly how I feel in a much better way than I could ever express it.  So when I saw an opportunity to apply for this unique challenge blog, I jumped at it!  Guess what?  I made the team.  I'm so excited.  Deanne  will be posting new challenges on the 1st and 15th of the month.  She will post a sketch and a list of songs/lyrics to inspire you.  It could be a central theme or just a couple of words from the song that inspire you.  Check out all the details here :  JUST MY SKETCHES

So I used today's sketch and was inspired by "Put Your Records On".  What a fun song.  For me, it says don't take everything in life so seriously.  Let your hair down, relax, and enjoy yourself every now and then.
And here is my card that expresses that!


I hope you will be inspired and hop on over to the Just My Sketches Challenge Blog and join us!

On a personal note :
We finally had a warm spurt down here in Florida.  It was so nice to open up all the windows and get some fresh air flowing through.  Here is a photo of one of my daughters cats sitting in the window, enjoying the fresh air as well.  I refer to her as "girl cat", teehee.  And yes there is a "boy cat" as well.  I'll have to catch a photo of him as well to post some day.  I think this photo reminds us that our pets can sometimes remind us that we should slow down and take time to soak up some fresh air and sun as well! 


"Therefore humble yourselves under the mighty had of God, that He may exalt you in due time, casting all your cares upon Him, for He cares for you."  1Peter 5:6-7.
Related Posts Plugin for WordPress, Blogger...