Monday, August 22, 2011

Bee Well Soon!


Good Morning Paper Crafters.  Today I am sharing a card using "Honey Sweet" art stamp set by Layers of Color.  Isn't this set just perfect for a get well card!  Colored using Copics.  I trimed the main image and layered it over to cut outs created using my Spellbinders Labels Five Nestibilities and my Grand Calibur.  The image is compatible with Labels 20.  I added shadow inside the fencing with yellow chalk and N00.  This one is clean and simple and easy to create.

I hope you have a bee-utiful day!
Melisa
******************************************************
You can view more of my Layers of Color projects HERE.
You can view more of my Bee projects HERE.
*****************************************************
Join the Layers of Color Facebook group HERE.

Sunday, August 21, 2011

Birthday Party Ensemble Tutorial


Hello Paper Crafters.  Today I'm sharing a birthday party ensemble that is deliciously sweet!  Designed using various Pink Persimmon stamp sets.  But the primary set is Vintage Cupcake.  This set comes with a yummy cupcake and lots of adorable cupcake toppers to choose from.  It also has a wonderful scalloped border.  You can stamp it as an outline and then color the scallops or stamp the inside with colored ink using the solid image.  And of course stamping it on patterned paper would be just as cute!
This ensemble includes a table top center piece, gift bag with tag, card, gift card holder, and a gift bags for the guest.  The table center piece is designed using paper mache boxes and an inexpensive paper party hat.  I am including a tutorial for this project and for a gift card holder.  Hope you enjoy it!


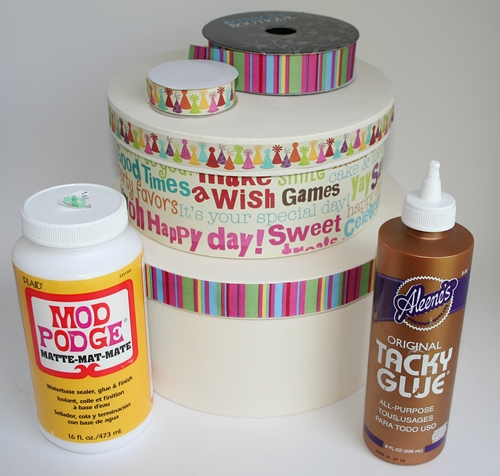
Begin by painting paper mache boxes with vintage white paint.  Trim patterned paper and adhere around top box with Mod Podge.  You have to work fast with this because it dry's fast.  Use as little as possible, because it can warp the paper.  With a foam brush, apply to back of paper and secure to box. 

 Adhere paper ribbon around edge of small box lid and striped ribbon around edge of larger box lid.  I used my Aleene's tacky glue for this.

Remove larger box lid.  Stamp cupcake in black ink around box.  Because the box is round, you have to roll the stamp from one side to the other.  Stamp the cupcake image on various coordinating pattern papers.  Cut the cupcake liners and cupcake icing's out separately.  And then adhere them over the cupcake images on the box.


At this point I figured out that I didn't leave enough space to add the toppers : ( .  So I had to substitute buttons.  So make sure when you create yours that you stamp those cupcakes closer to the bottom edge!  Create a bow with the striped ribbon and adhere to the front of smaller box.


I created a decorative party hat to top off my paper mache birthday cake.  I purchased a set of paper hats that were on sale for $1 and embellished one.  Open up the hat from the back and lay it out flat.  Apply Mod Podge and adhere it to the backside of some patterned paper.  Once dry, trim off excess paper around the edges.  Bring the 2 edges together at the back of the hat and adhere together with Aleene's Tachy Glue.  Adhere an extra large chenille stem around the bottom of the hat.  Adhere a large pom pom at the top of the hat.

Create a coordinating birthday card, gift tag for the gift bag, and gift card holder for the guest of honor.  And gift bags for your guest.


I added one of the cute toppers and the scalloped border from the "Vintage Cupcake" set to the card.  I stamp the "Dutch Journal Circle" on cream cardstock and green patterned paper for the background.  Trim the inside circle from the cream image and adhere it over the green one.  I created the  pink scalloped circle using my  Spellbinders Classic Scalloped Circles and the Grand Calibur.


These little gift bags are so easy to assemble and come in a variety of colors from Creative Cuts and More (Square Bag #01)  They are pre-cut and pre-scored.  Just fold and adhere!  The sentiment on this one is from the "Vintage Greetings" set.  I used my Spellbinders Standard Circles and Scalloped Circles with the Grand Calibur to create the background on the front of the bag.


I used the "Vintage Greetings" and "Ric Rac Circles" for the sentiments on the tag.


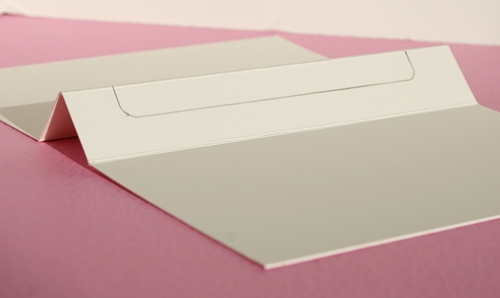
This little gift card holder is also easy to create using a Scor-Pal.  The sentiment is from the "Hello Vintage Girl" set.


Trim cardstock 4.5" x 7".  Score, from the left side, at 2 3/4", 3 1/2", and 4 1/4".  Fold at score lines. 


Use your gift card to draw penciled guidelines and cut. 


(this is not the actual card, but a prop to show you where to glue)

Flip it over and adhere along the edge as shown.  Do not apply too much glue or you want be able to slide your gift card in the slot you have created. 


Stamp and embellish outside of gift card holder and secure with ribbon.


***********************************************************
Supply List

Stamps : Pink Persimmon
Hobby Lobby : paper mache boxes, patterned paper, paper ribbon, striped ribbon, large chenille stems, Mod Podge, Aleene's Tachy Glue.
Michaels : large pom pom
Deckled Scissors : Fiskars

****************************************************
You can view more of my tutorials HERE
You can view more of my Pink Persimmon projects HERE
You can view all of my Altered Projects HERE

Thursday, August 18, 2011

The future is bright ...

Hello Paper Crafters!  Is anyone going to be stamping today??  If you are, what will you be working on??  I created this one using one of Layers of Color's new releases "Encouragement" art stamp set.  Nina Brackett has a designed this set with some beautiful sentiments and verses in it, 8 total.  I was going for a shabby / vintage feel with this one.  The patterned paper and "Victorian Frame" reminded me of something you might have seen on a wall many years ago.  I added the little flower from my "Merci Bouquet" set. I used  the last piece of one of my most favorite lace on this one.  I had found it in an antique store.  It probably wasn't antique, who knows, but it was definitely unique.  Time to hit the anitque stores for some more rare finds.
Patterned Paper : The Girls Paperie "Kitch"
The next 2 were designed for Take Ten.  The cards are only supposed to take 10 minutes to create, so I had to keep them fairly clean and simple.  I have mailed them in and hope to see them in a future publication!

Supplies:
Stamps : Layers of Color “Pansy Corner” cling stamp set, “Flutterescent” and “Encouragement” art stamp sets
Copic Markers
Spellbinders Labels Eight and Grand Calibur
Stamp images on white cardstock. Trim sentiment using Spellbinders Labels Eight die with Grand Calibur. Ink edges. Color butterfly and pansy’s with markers and trim. Adhere all pieces to front of card. Ink edges.


Stamps : Layers of Color “RoseBlossom Frame” cling art stamp (compatible with Spellbinders Labels 16)  I did not use the Labels 16 die on this project.
and “Honey Sweet” art stamp set
Ink : Momento
Copic Markers
Ribbon unknown

Stamp rose frame on front of A2 card and color. Stamp sentiment. Stamp bee’s on separate white cardstock, color, and trim. Adhere to front of card. Tie bow and adhere.


Thanks for stopping by and I hope you have a fabulous weekend!
I am really excited to be meeting up with some new friends for a card swap tomorrow morning.
big hugs,
Melisa
**********************************************************

Challenges
Sentimental Sundays - flowers and a sentiment (little flower at the bottom of the frame and on the dp)
Tuesday Taggers - anything goes
Truly Scrumptious (wed) - lace
Mark's Finest Papers - distressing (lots of brown ink and frayed edges)

*********************************************************

You can view more of my Layers of Color projects HERE.

Wednesday, August 17, 2011

The Craft's Meow


The Craft's Meow.  What a clever name for a stamp company!  Have you heard of this newer stamp company??  I say newer because it's actually been open for a couple of months now.  Some really great designs.  Nina Brackett is one of the fabulous designers and these cards were created using 2 of her sets.  You can check out all of The Craft's Meow products HERE.


 I kept these designs clean and simple because I want to include them in a class. 
hope you are having a fabulous week!
Melisa
**************************************
Project Details
Stamps : Butterfly Kisses and Fly Free
Patterned Paper : My Mind's Eye

*************************************

Challenges
Cute Card Thursday - clean and simple (card #2)
A Spoon Full of Sugar - birthday card
My Time to Craft - G is for ...  girl
Papertake Weekly - BINGO (I have button, ribbon, free space - card #2)
Stampanvie - girly

************************************

You can view more of my The Craft's Meow projects HERE.
You can view more of my Clean and Simple projects HERE.


Tuesday, August 16, 2011

Back to School

9x9 Layout


Good Morning Paper Crafters!  Today I'm sharing a 9 x 9 layout designed using my sweet husbands 1st grade class photo.  I don't even remember 1st grade, do you???  And I don't have a photo, so I would love to tell you that I just love my teacher, if I could only remember her, HA!  What about you??  Can you remember any of the Elementary years??   But ...  I'm sure I was a little angel, enthusiastic about learning and very obedient ...  every teachers dream, teehee. 

The "Little Red Wagon" stamp set was just perfect for this layout.  You can use the boy or girl image and there are so many cute items to load the wagon up with.  There is a birthday cake, valentine hearts, pumpkins and more!  A fun sentiment for a friend when creating a card  using this image would be "When you wagon is full, I'll help you pull".  You can check out this set HERE

"Little Red Wagon" looks great combined  with Kaiser Crafts "Class of '87" 12 x 12 paper collection for this layout.   I used "Timeless Tables", "Show and Tale", and "Sports Day" from the patterned paper collection, along with the matching rub-ons.  The line comes with  some other great embellishments and a 6 x 6 paper pad as well, HERE.


My sweetie is the short little guy standing by the teacher with the crew cut.  
What a handsome little guy he was.  Still is!!
******************************************

Project Details
Stamps : Pink Persimmon "Little Red Wagon"
Patterned Paper / Rub-ons : Kaiser Crafts
Border Punch : Fiskars
Trim red patterned paper 9 x 9".  I  used only certain horizontal strips from the "Sports Day" sheet and combined them to create the bottom part of the background.  Trim background patterned paper slightly smaller than 9 x 9 and adhere to red cardstock base.  Doodle around edges.  Ink edges of photo with red ink.  Use scalloped border punch to create a border from red cardstock.  Adhere to bottom backside of photo.  Adhere green ribbon.  Adhere photo to page.  Stamp Little Red Wagon's boy, stack of books, and wagon on white cardstock.  Color with markers.  I paper pieced the shorts because I didn't have the correct shade of blue to match.  Adhere to layout.  Trim just the "A" and "B" sections of the "Show and Tell" patterned paper sheet and adhere to layout.  Doodle around edges.  Embellish rest of page with rub-ons and buttons.

*************************************************************************

You can view more of my Pink Persimmon projects HERE.
You can view more of my Scrapbook Layouts HERE.

You can view more of my Back to School / Teacher Appreciation projects HERE.

Saturday, August 13, 2011

Time flies ....


Hello Paper Crafters!  How are you all doing??   It's been very busy the last couple of weeks and I can't believe how time has flown by since my last post.  Lots of great things that I'm so very thankful for have been keeping me very busy ...  increased work hours, my daughters visit for 10 days, getting together with a new crafty friend, and  ....  shoving my 23 year old baby bird out of the nest!!  Yep it's official, he has his own apartment.  We are all excited.  My in-laws drove all the way from Georgia to help move him and get him settled in.  What a blessing they are and we are so excited to share this special time with them!  And of course they have spoiled him with a few house warming gifts.  So, it's been a long day of lifting furnature and boxes and with this heat, I'm ready for bed.  But I wanted to get a quick post up first.  Hope you like it!
very tired hugs,
Melisa

****************************************

Project Details
Stamps : Layers of Color “Warbler” and “Nestling” cling art stamps
Patterned paper : Carolee Creations Cardstock : Bazzill
Ink : Tsukineko Brilliance Pearlescent Brown
Copic Markers, Brown Micron pen
Trim brown cardstock and adhere to front of A2 card. Trim patterned paper slightly smaller, stamp nest and color eggs. Stamp nest again on masking tape and trim along top only where bird over laps. Cover nest with mask and stamp bird. Adhere to card front and doodle around edges.
***************************************************************

You can view more of my Bird Projects HERE.
You can view more of my Layers of Color projects HERE.

Wednesday, August 3, 2011

You're A Jewel


Hello Paper Crafters!  I'm posting tonight to let you know that Pink Persimmon is sponsoring the Play Date Cafe challenge blog tomorrow (thursday)!  so hop on over and see how you can quailify to win a Pink Persimmon stamp set!  The challenge runs from Thur Aug 4 - Tuesday Aug 9th.

If you like today's jeweled card then you should check out the purple version I posted in June HERE.
Lots of fussy cutting again!

*******************************************

Project Details
Markers : Copics B24, B29
Cardstock : Bazzill
Lace : from Hobby Lobby
Tools : Fiskars Deckled Scissors, Fiskars Lace Border Punch
Glitter Glue : Stickles
Trim blue cardstock 4.25 x 5.5” and adhere to card front. Trim white
cardstock to fit lace with punching along each side. Adhere border
and lace to card front. Stamp jewels and sentiment. Color jewels
with markers and embellish with glitter glue. Trim around s
entiment as shown, adhere to blue cardstock and trim around edges
with deckled scissors.
*******************************************
You can view more of my Pink Persimmon projects HERE.

Friday, July 29, 2011

Beach Mini Album


I had so much fun making this Beach Mini Album!  My basic supplies were paper, ink, and stamps!

I decided to use the Creative Cuts and More 6" x 6" album.   You can order an album kit, or the cover and pages individually.  You have the option of regular pages or pages with tab.  So many options.  I started with chipboard pages and and covered them with cardstock.
The albums come in other sizes and you can check out all of Creative Cuts and More album options HERE.  Don't forget to check out the kits as well.


I stamped the light blue cardstock with various swirls and seashells with "bashful blue" by SU.  I inked the edges of the label, light and medium blue cardstocks with Tsukineko Brilliance Pearlescent Chocolate and  Pearlescent Beige.
Most of the images are from GinaK's "Gifts From the Sea".  I included a few images from Layers of Color "Under the Sea" and Crafty Secrets "Seaside" as well. 


You can achieve that beachy feel ...
by adding twine / raffia / jute and by distressing the edges with ink and a Tim Holtz distress tool.  Don't be afraid to add a little ink or paint around the edges of your photo as well.  Scroll all the way down to check out a few more idea's on how to achieve that beachy look, including sand.


The die used for the labels was Spellbinders Labels Eight with my Grand Calibur.


There is a lot of fussy cutting, but worth it!


Your next blog to visit is ...
the entire blog hop list is ...

Need a few more beachy idea's ??

If you want to add "sand" to your layouts ... use pumus.
And cheese cloth is another great product to use on your beachy layouts.


 I created this layout using the "Seaside" set by Crafty Secrets.

I created my own chipboard charms.


You can see the pumus - sand in this close-up.  You can get pumus in the artist section of your local craft store.  It comes in a grey color, but you can easily mix paint with it.


And you can see the cheese cloth in this close-up.

I hope you are inspired to scrapbook those summer photo's!
hugs, Melisa

******************************************************

You can view more of my Mini-Albums HERE.
You can view more of my Beach / Summer projects HERE.
You can view more of my Creative Cuts and More Projects HERE.

Wednesday, July 27, 2011

Look who's one!

9 x 9 Layout

Who's this sweet little guy???  This is my son Travis 22 years ago, sitting in his grandmother's lap.  Look at those smiles!  It makes me smile just to look at them.  And look at Namaw, encouraging him to be bad and stick his hand in the cake.  I have to say, he never needed much encouragement.  He was my little stinker!

I don't know if you can tell, but there is a clown on the cake.  So I just new that my Pink Persimmon stamps would be sooooo cute on this layout, and I think I was right.  And these images would be perfect for birthday cards as well.  I used Vintage Cupcake and Small Banner set.  The cupcake set has lots of other cute toppers you could use and an adorable scalloped border.  This is the 3rd time I have used the small banner set and I can't wait to use it again.  There are several banner patterns to choose from and 2 other sentiments in addition to happy birthday.  Now I need the large banner set.
The Pink Persimmon website has a great gallery to inspire you.  But you can view the latest projects designed by the new design team by subscribing to the blog, HERE.  To sign up for their newsletter click the grey border across the bottom of the home page HERE.
Thanks for stopping by and letting me share a few of my memories with you.
Stop by tomorrow for a summer mini-album blog hop and some inspiration on how to scrapbook those summer photo's.
hugs, Melisa
**************************************************************
Project Details
Trim red cardstock 9 x 9" and ink edges with black ink.   Trim white cardstock 8 1/2" x 8 1/2" and ink both sides with black ink.  Adhere to red cardstock. Trim striped paper 8 1/2" x 3/4" and ink edges.  Create blue scalloped border with Fiskars border punch and adhere to underside of striped border.  Ink edges of scallops then adhere to bottom border of white cardstock.  Years ago when chipboard was so popular, I purchased a pack of 12" chipboard shaped borders and the scallop was one of them.  I never used the actual chipboard scallop because I wanted to use it as a pattern.  That is how I created the scalloped border along the top.  I did a search and found that a chipboard company named Magistical Memories has one HERE.  Stamp cupcakes on white cardstock and on colored cardstock or patterned paper.  Color cupcake with Copics.  Trim liners from colored paper and adhere to front of cupcakes.  Normally I use Liquid Applique to add dimension for icing, snow etc.  But I'm out, so I decided to try something new.  I used my Aleene's Tacky Glue.  It's so thick allowing me to build up the icing.  If I got in on the line, I used a toothpick to remove it.  Sprinkle with glitter.  Stamp cupcake toppers, color with Copics and adhere.  Set aside to let icing dry.  Stamp banner, trim, and punch mini holes in eash corner.  String with floss.  Paint chipboard letters for the "one".  Arrange / adhere photo's and decorative elements.  Stamp "look who's" using the SodaPop Alpha set.

****************************************************************************

You can view more of my Scrapbook Layouts HERE.
You can view more of my Pink Persimmon projects HERE.

Monday, July 25, 2011

Mini Album #5 : Beach Album


Good Morning Paper Crafters.  Today I am sharing a summer album I created a few years back and never shared on this blog.  It was designed using a mini album by The Angel Company.
It's called Pemberly Bay.  It's a matchbook album and REALLY easy to put together. 


This photo is of my daughter.


and a few friends.

The stamp sets I used for the seahorse / seashells / phrases is an old TAC set, but a couple of other stamp sets that work well instead would be GinaK's "Gifts From the Sea" and Layers of Color's "Under The Sea".


And in this photo from left to right : a friend, my daughter and my son.

More friends on these 2 pages.


If you like mini-albums then please join me on Friday for a summer mini album blog hop sponsored by Creative Cuts and More.  I'm sure you will find lots of inspiration for your summer albums!

And if you need a consultant from The Angel Company so you can order your own Pemberly Bay mini album kit ($6.95), then please email me at luv_2_stamp@yahoo.com.  I just happen to know a few of them that you could order online from.

Thanks for stopping by!
Melisa

*******************************************************

You can view more of my Mini-Albums HERE.
You can view more of my Beach / Summer projects HERE.

Friday, July 22, 2011

Artist Trading Card / Pink Persimmon

I've been busy making ATC's again. Ready to trade??  Artist Trading Cards are fun to make and at 2.5" x 3.5", don't require a lot of resources or time.  If you are new to Artist Trading Cards, you can learn more about them and see a list of resources on one of my older post HERE


I used images from 2 Pink Persimmon stamp sets to create these little works of art. 
"Tea and Cake"  is so sweet, and girly, and vintage!  I LOVE it.  It comes with 2 different tea pots, tea cups, and a cake stand.  I used the tea cup images and stacked them on ATC #1.  My daughter had a tea party as a child for one of her birthdays, so I'm thinking this set would be just perfect for a future layout as well.


"Singing Birds"  comes with an arch / frame image and of course, some singing birds.  Oh the possibilities for adding things in the center  ...  big bird's nest,  a tree.  I thought there should be a little bird house dangling from the center so  I created my own for ATC #2.  What would you embellish or add to this image to finish it off ??

*************************************************

Project Details
Stamp Sets : Pink Persimmon "Tea and Cake" and "Singing Birds"
Copic Markers
Spray Ink : Tattered Angels Pink Taffy
 
Trim black cardstock 2.5" x 3.5" twice.  Trim lined pattern paper slightly smaller.

ATC #1 - Adhere lined paper to black card base.  Spritz doily with pink spray ink, adhere to front of card and trim along edges.  Tie green seam binding and tie bow.  Doodle around edges.  Stamp bottom tea cup on white cardstock.  Stamp tea cup on Eclipse Masking Tape and trim.  Lay tea cup mask over bottom tea cup and stamp tea cup #2 with the bottom of the cup over lapping the top of the bottom tea cup, giving the appearence that is is sitting down in the bottom tea cup.  Remove mask from bottom tea cup and cover tea cup #2.  Stamp tea cup #3 the same way, creating a stack of tea cups.  Remove tea cup mask and color.  Trim image and use raffia to build a little nest by adhering it to the back of the top cup.  Stamp a singing bird, color, and trim.  Adhere tea cup stack and singing bird to front of card.  Print this phrase or one of your own, trim, adhere and doodle around edges.

ATC #2 - Stamp part of the tree frame on the lined paper and color with markers.  Adhere to front of card.  Tie ribbon around bottom border and tie a bow.  Create you own bird house by cutting a square and triangle and adhere to front of card as if it is dangling from a hook in the center.  Doodle around the edges and embellish with rub-ons.  Stamp tea cup and singing bird on white cardstock and color with markers.  Adhere raffia to back of cup to create a nest, then adhere to front of card.  Print this phrase or one of your own, trim, adhere, and doodle around the edges.

****************************************************

You can view all of my Tea / Teacup related projects HERE

You can view more of my Artist Trading Cards HERE.
You can view more of my Pink Persimmon projects HERE.

Wednesday, July 20, 2011

Having a "ruff" day? Check out these cuties!


Greetings Paper Crafters!  Remember those cute dog images from last month's ATC's??  Well here they are again.  "Scottie Dogs" comes with 4 different dog poses.  What's fun about this set is that there are several coat pattern options, polka dots and argyle in addition to the pattern used above.   And I'm not sure I've ever combined yellow and pink before, but I am lovin' it now.  This one was easy to put together using a pre-made tag.   What do you think? 
********************************************************

Project Details
Stamps : Pink Persimmon Scottie Dogs
Copics :  Y00, YR23, RV0000, RV00
Patterned Paper : The Paper Studio (Hobby Lobby)
Spray Ink : Tatterned Angels Glimmer Mist Pink Taffy
Tags : Creative Tags by Paper Reflections (Hobby Lobby)
Roses : Recollections Boutique (Micheals)
Lace : from local antique store
Ribbon : May Arts

Trim yellow polka dot paper  slightly smaller than front of card and adhere.  Adhere lace vertically.  Spray paper doily with spray ink.  Adhere to front of pre-cut tag and trim along sides.  Stamp "greetings" sentiment.  Adhere to front of card.  Adhere ribbon and roses to top of tag.  Stamp dogs.  Color coat and bow.  Trim dogs and adhere to front of card.  

******************************************************

You can view more of my Vintage / Shabby Projects HERE.
You can view more of my Pink Persimmon projects HERE.

Related Posts Plugin for WordPress, Blogger...